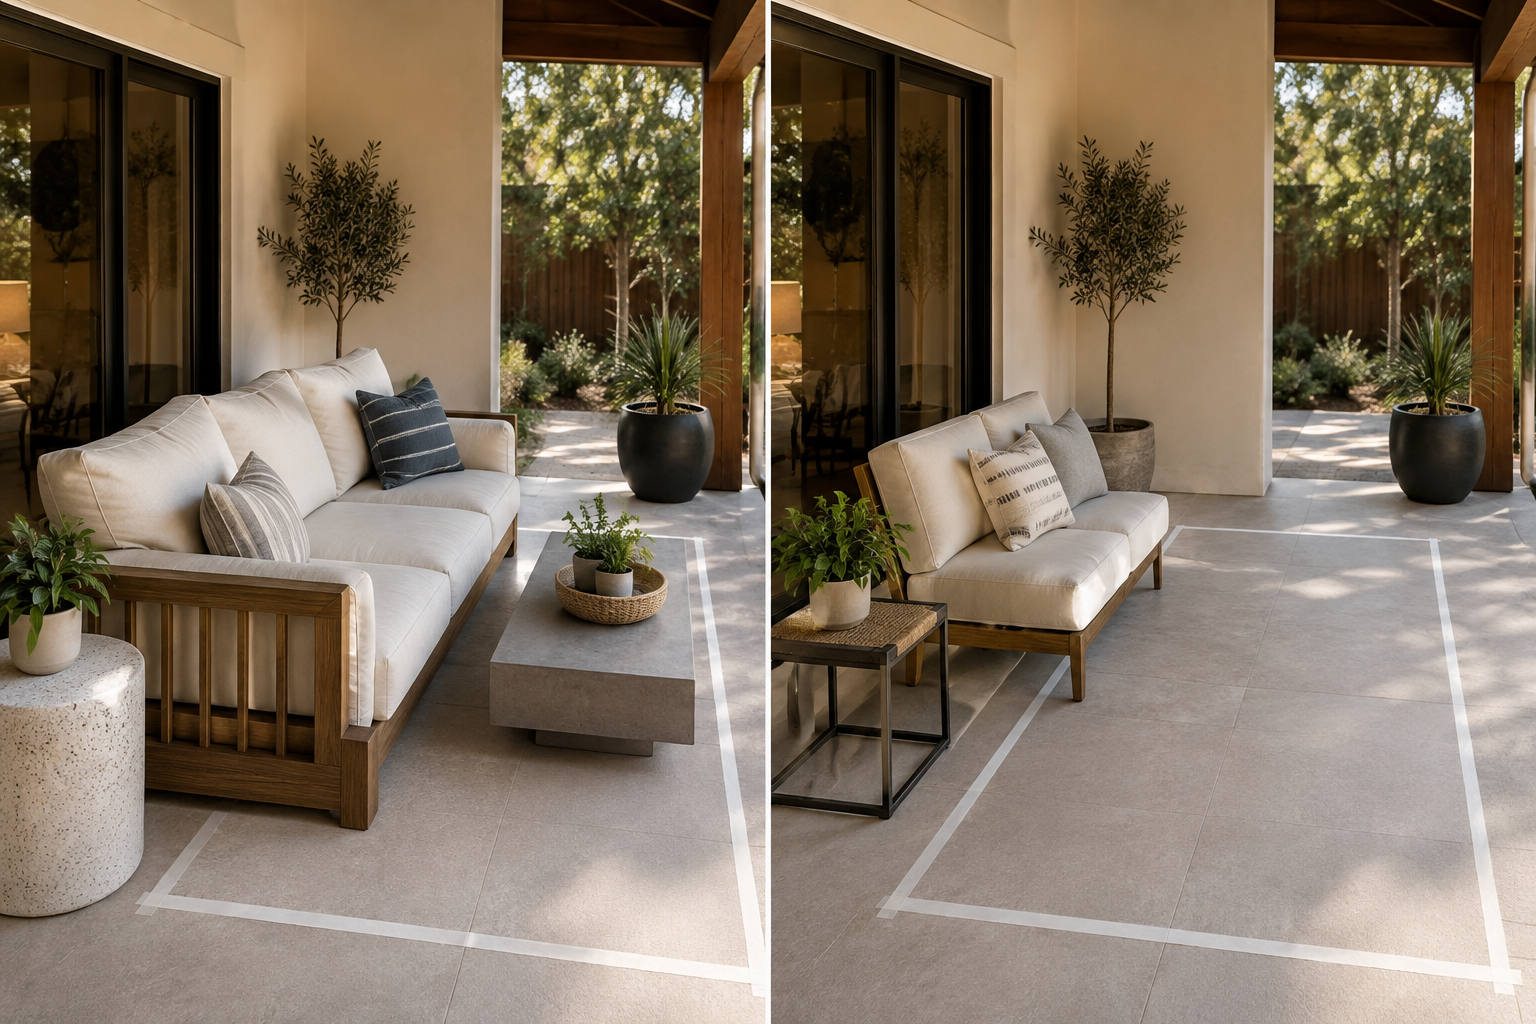
Author: Small Space Outdoors Editorial Team

  • Best Vertical Planters for Balconies and Small Patios

    The best vertical planter for a balcony or small patio concentrates plants without making watering, pruning, drainage, or movement harder. A narrow footprint helps only when the structure is stable, the upper plants are reachable, and water does not create problems below.

    Begin with the location and plants, not the number of pockets or shelves. Measure the available width, depth, and height; note sun, wind, wall access, drains, and the route from the door; then choose a format suited to the property rules and your maintenance routine.

    Decision factors for a small-space planter

    • Footprint: exterior width and depth, including feet or stabilizers.
    • Height and reach: can every planting level be watered and pruned safely?
    • Mounting: freestanding, wall-supported, hanging, or railing-compatible?
    • Loaded weight: structure, containers, wet growing medium, mature plants, and water.
    • Drainage: where does excess water go?
    • Exposure: sun, shade, reflected heat, wind, and seasonal conditions.
    • Plant access: enough room for growth without blocking the route or railing.
    • Maintenance: cleaning, refilling, repotting, and seasonal storage.

    Balcony permissions and limits vary. Do not assume that a wall, railing, ceiling, or floor can accept a planter or its loaded weight. Confirm building, landlord, association, lease, and local requirements, and follow the specific product’s mounting, loading, and wind instructions.

    Vertical planter types compared

    Planter typeBest suited forSpace advantageMain tradeoff
    Freestanding tiered planterRenters and flexible layoutsNo wall attachmentBase depth and stability
    Ladder-style shelfIndividual removable potsUses height while keeping plants accessibleNeeds suitable support or stable freestanding design
    Pocket planterLightweight plant groupings where approvedVery shallow profileMounting, moisture, and uneven watering
    Planter with trellisClimbers and targeted privacyCombines container and supportLoaded weight, wind, and mature growth
    Stacked modular planterCompact herb or flower groupingsMultiple planting levels in one baseWater distribution and access
    Railing-compatible planterApproved railings onlyMay preserve floor spaceCompatibility, attachment, and fall risk
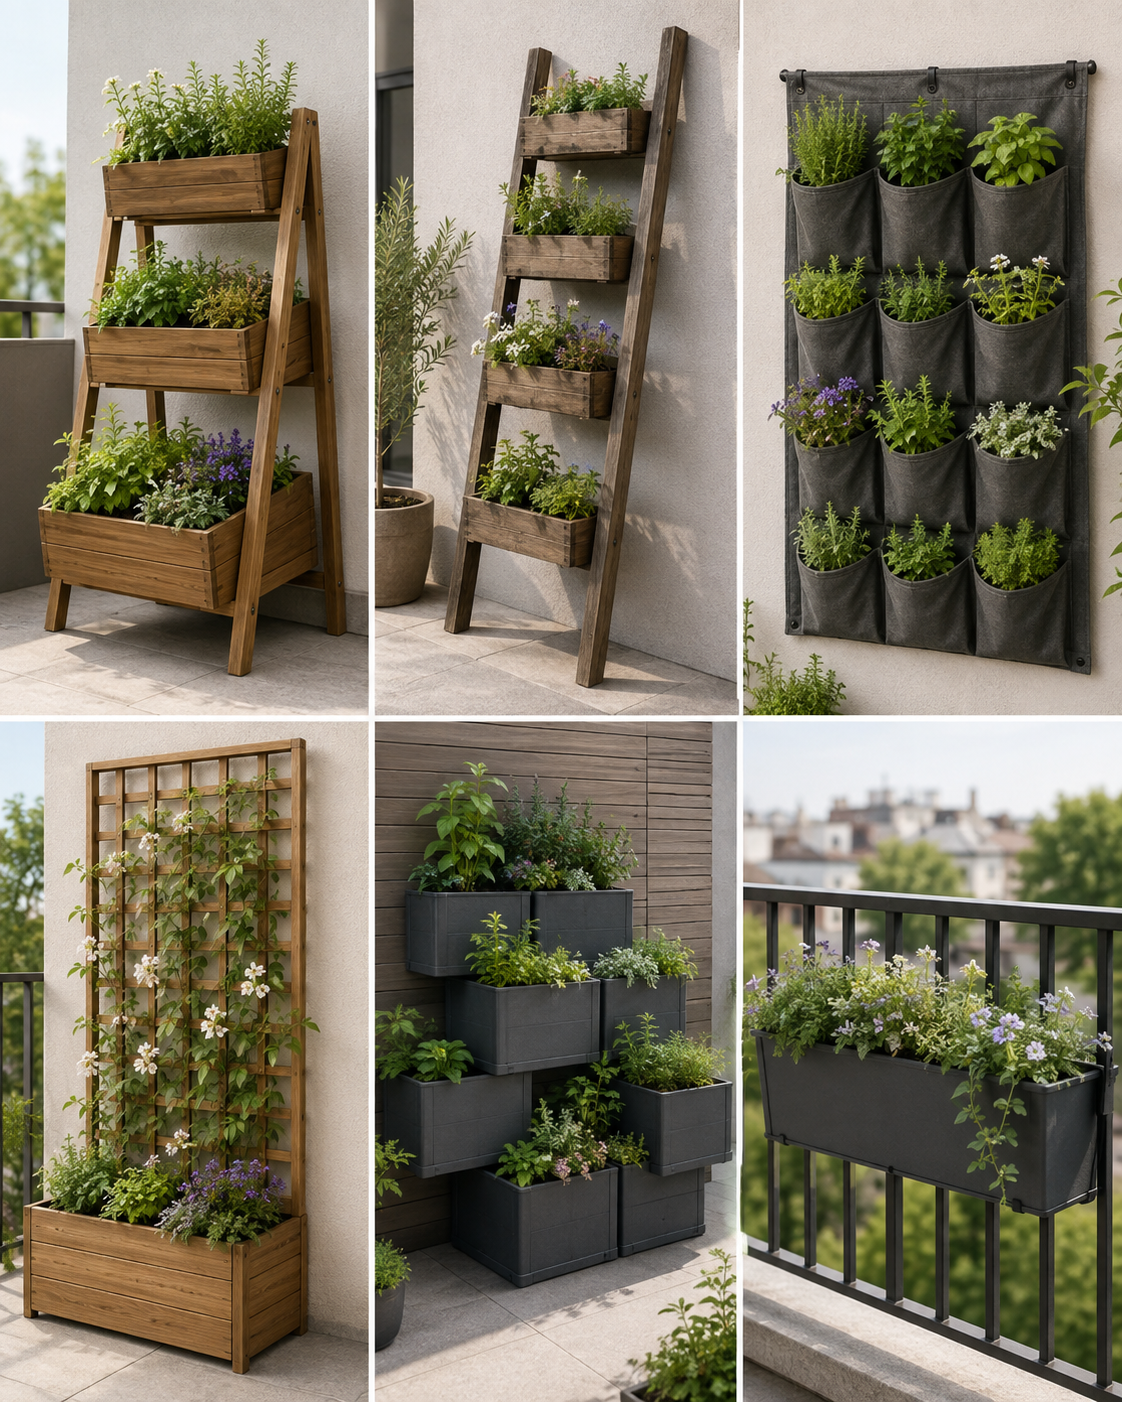
    Six vertical planter types for balconies and small patios.

    Best renter-friendly option: freestanding tiered planters

    A freestanding tiered planter avoids permanent wall attachment and can move as light conditions change. It suits herbs, flowers, or compact foliage when each tier remains accessible. The structure still needs a stable base and placement appropriate to wind and the loaded weight.

    Check the total assembled dimensions and spacing between tiers. Tall plants on a lower level may crowd the shelf above, while a wide upper container can shade lower plants. Confirm how drainage moves from one level to the next.

    Best for removable pots: ladder-style shelves

    A ladder-style plant shelf keeps pots separate, making it easier to rotate, repot, or bring individual plants indoors. Freestanding models should be designed to stand safely without improvised support. Leaning models require a suitable surface and any permission or attachment specified by the manufacturer.

    Place heavier pots only where the product directs and stay within stated limits. Keep shelves away from required exits and railings where they could create a climbing hazard.

    Pocket planters: shallow but maintenance-heavy

    Pocket systems can create a large planted surface with little projection, but they put moisture close to the mounting surface. Watering may be uneven, upper pockets can dry differently from lower pockets, and mature roots may have limited volume.

    Use only with an approved mounting system and a surface protected as the manufacturer directs. Plan how to capture drainage, inspect behind the planter, and remove the system for maintenance.

    Planters with trellises: planting plus partial privacy

    A planter-and-trellis combination supports climbing plants and can interrupt a specific sightline. It is often deeper and heavier than a shelf or pocket system, especially after watering and mature growth. Wind exposure also increases as foliage fills the trellis.

    Choose plants for actual conditions and confirm how the trellis is stabilized. For non-plant privacy alternatives, compare the formats in Best Privacy Screens for Balconies and Small Patios.

    Stacked modular planters: compact planting volume

    Stacked planters group several planting pockets around one vertical column or base. They can suit compact herbs or flowers when the modules remain stable and each pocket receives appropriate light and water. A top-heavy arrangement or uneven watering can create problems.

    Confirm the intended maximum configuration and do not add modules beyond manufacturer guidance. Rotate or reposition only when the loaded planter can be handled safely.

    Railing planters require exact compatibility

    A railing-compatible planter should be used only on the railing types, dimensions, and locations specified by the manufacturer and permitted by the property. Generic hooks or improvised ties are not substitutes for a compatible attachment system.

    Do not obstruct railing function, drainage, inspection, or required exits. Consider the consequences of wind, watering, falling objects, and access below. If suitability is uncertain, choose a stable freestanding planter instead.

    Plan watering before planting

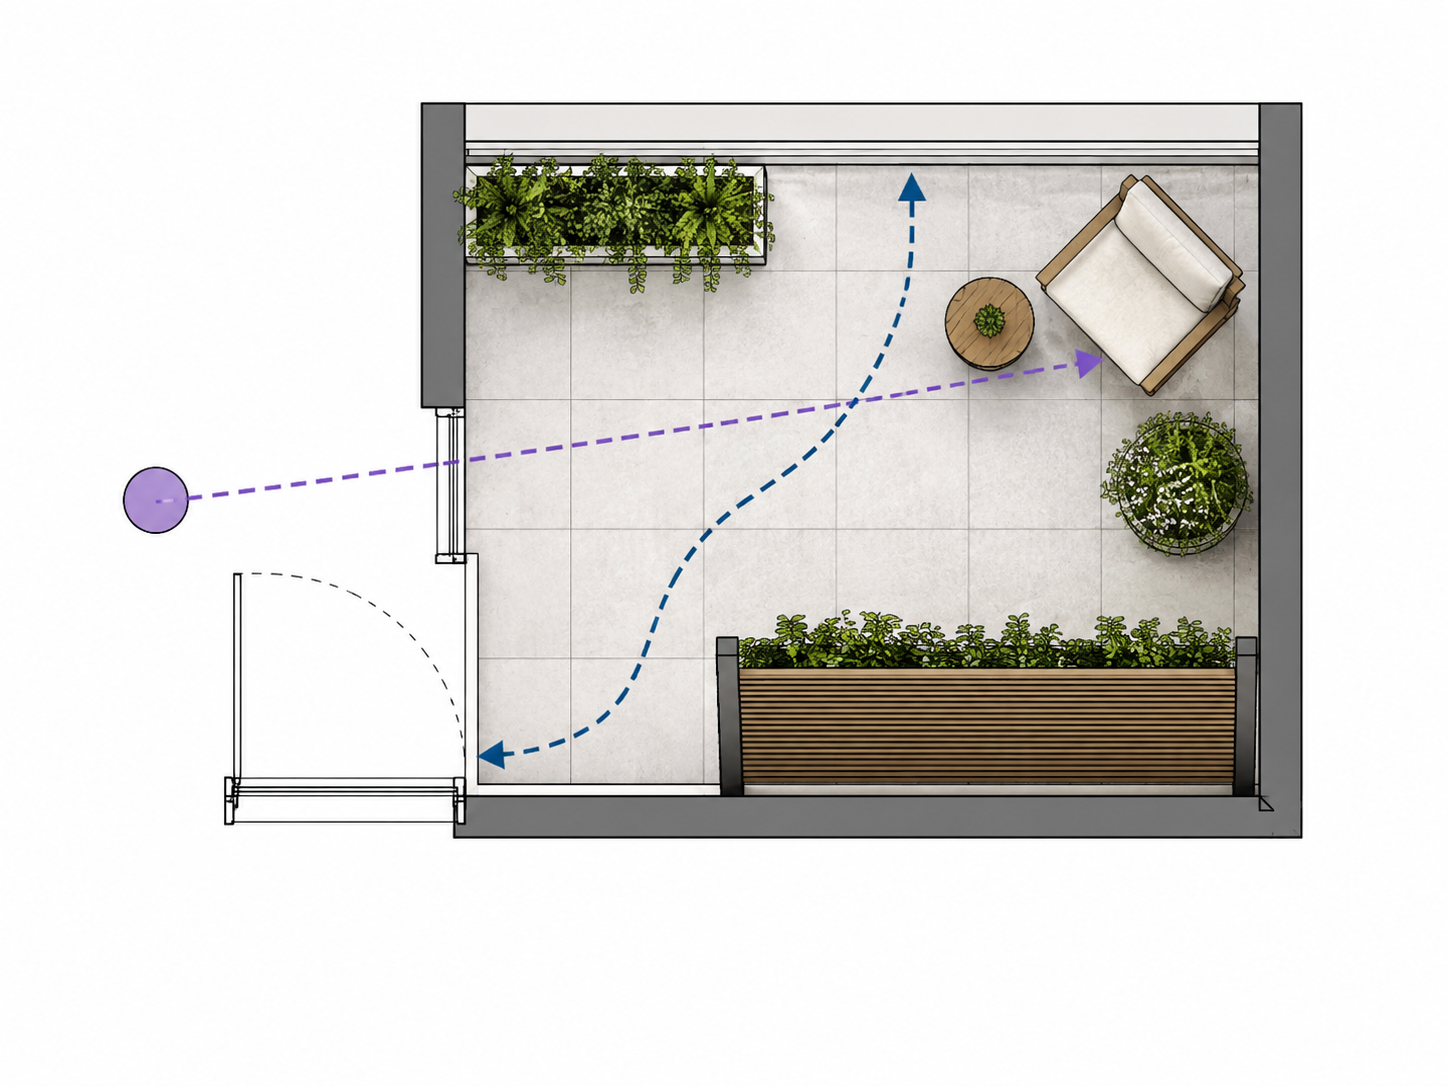
    Fill the empty system with containers or temporary weights only as the manufacturer permits, then test access with a watering can. Can the highest level be reached without climbing? Can runoff be captured? Can the floor and wall behind the planter be cleaned?

    Self-watering reservoirs and drip systems vary by design. Verify capacity, overflow behavior, maintenance, and indoor connection requirements from current product instructions rather than assuming they eliminate routine care.
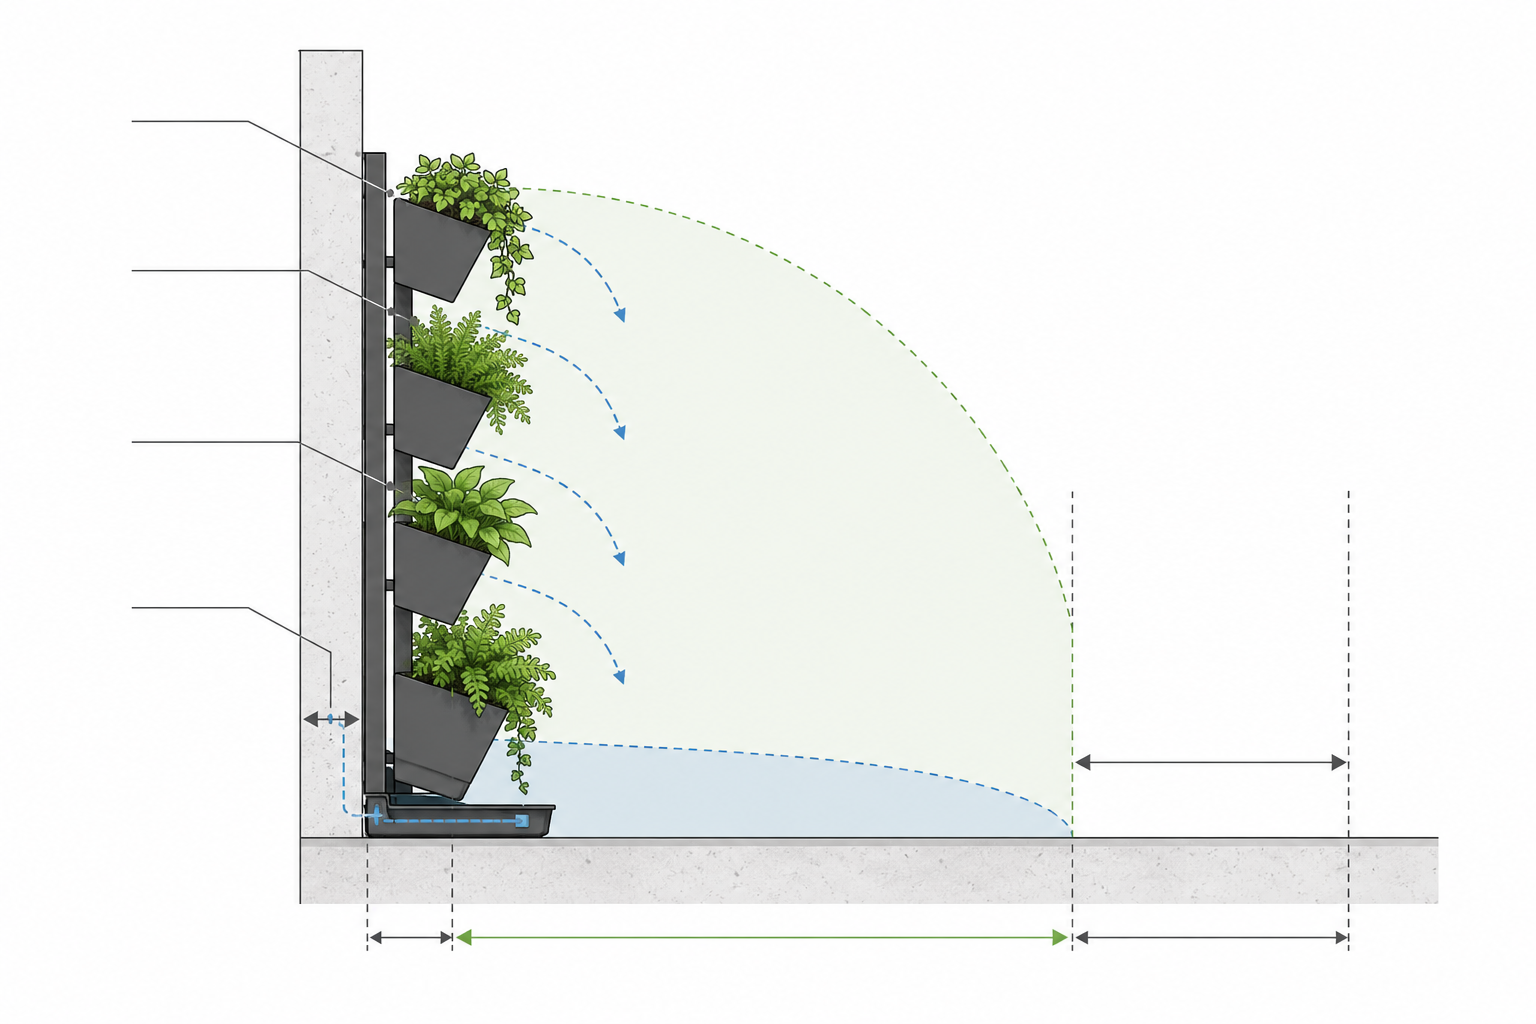
    Watering and clearance plan for a tiered vertical planter.

    Match plants to each level

    Upper tiers may receive more sun and wind, while lower tiers may be shaded or receive runoff. Observe the location before choosing plants. Group species with compatible moisture needs, allow for mature width and height, and avoid plants that will overtake the route or neighboring property.

    Edible gardening introduces additional questions about growing medium, containers, water quality, and plant suitability. Use reliable horticultural guidance appropriate to the crop and region.

    Integrate the planter into the layout

    Place one vertical planter at the edge of the activity zone rather than adding small pots throughout the floor. It can frame a chair, soften a privacy screen, or create a destination at the end of a narrow yard.

    For balcony layout ideas, see Apartment Balcony Makeover Ideas That Still Leave Room to Move. Ground-level readers can use the zoning approach in Small Backyard Ideas for Narrow or Limited Spaces or the editing principles in Small Patio Makeover Ideas That Don’t Feel Crowded.

    A vertical-planter buying checklist

    1. Measure the complete footprint, height, and maintenance access.
    2. Confirm sun, wind, temperature, wall, and drainage conditions.
    3. Choose freestanding or approved mounting for the property.
    4. Review loaded-weight limits and stability instructions.
    5. Plan how every level will be watered, drained, and cleaned.
    6. Choose plants for mature size and conditions at each tier.
    7. Keep the door, required route, railing, drain, and utility access clear.
    8. Confirm seasonal storage and disassembly requirements.

    The takeaway

    A vertical planter saves useful space only when it remains stable and maintainable. Favor a freestanding tiered planter or ladder shelf when reversibility matters, and use attached or railing-compatible systems only with exact product compatibility and property permission. Plan watering, mature growth, and access before counting planting pockets.
  • Small Backyard Ideas for Narrow or Limited Spaces

    A narrow backyard becomes more useful when it has a clear route and a small number of purposeful zones. The goal is not to fill the length from fence to fence. It is to create a sequence: an easy entrance, one comfortable destination, and planting or storage that supports the way the yard is used.

    Measure before choosing furniture or hardscape. Record the true width at several points, door and gate locations, drainage, utilities, grade changes, permanent plants, and access needed for maintenance or emergencies.

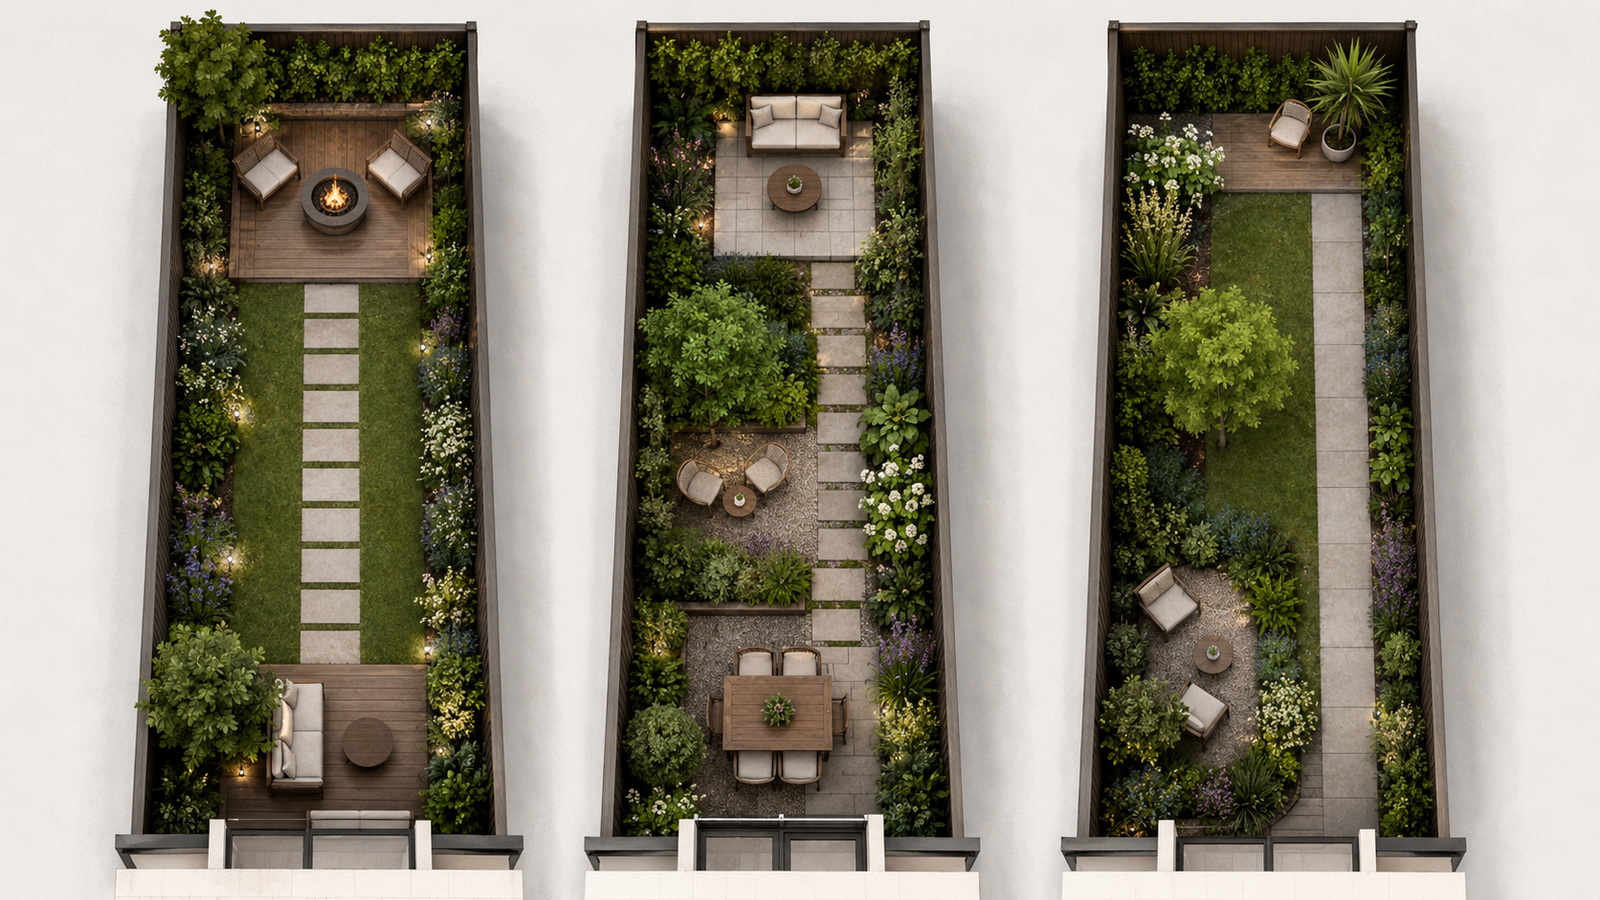
    Choose a layout pattern

    Layout patternBest forHow it uses the widthWatch for
    End destinationDining or a reading retreatKeeps the route simpleLong empty middle without planting rhythm
    Two offset zonesSeating plus gardeningCreates changing viewsA zigzag path that becomes awkward
    One-side arrangementVery narrow yardsPreserves one continuous pathOverloading the occupied edge
    Central pause pointSquare-ish limited yardsCreates one shared focal areaBlocking access beyond it

    1. Put the main destination at the far end

    A small table, bench, or pair of chairs at the far end gives the eye a reason to travel through a narrow yard. The distance creates a sense of depth, while the entrance remains open. Use a restrained focal point such as one larger planter, a small tree suited to the conditions, or a simple screen where permitted.

    Do not block a required gate, utility access, drainage route, or maintenance path. Confirm setbacks, property rules, and local requirements before adding permanent structures or planting near boundaries.

    Three layout options for a narrow backyard.

    2. Keep one route continuous

    A path that changes material, width, and direction too often can make a small yard feel fragmented. Choose one clear route from the house or gate to the destination. For comfortable movement, 30 to 36 inches can be useful general planning guidance where the property permits, but it is not a universal code or site requirement.

    Actual requirements vary by property, local rules, association restrictions, and lease terms. Required access, egress, utilities, drainage, and maintenance needs take priority. A wider route may be necessary for accessibility, equipment, or local requirements.

    3. Arrange furniture along one side

    Place the largest seat or table against one usable edge rather than filling both sides. A slim bench, two compact chairs, or a narrow dining table can define the activity while preserving a continuous path opposite it.

    Compare total dimensions and operating clearances using Best Patio Furniture for Small Spaces. If storage seating is part of the plan, confirm lid access and intended seating use with Best Outdoor Storage Benches for Small Patios.

    4. Use planting to create rhythm, not a tunnel

    Repeating two or three plant forms at intervals can guide the eye without creating a continuous wall. Keep mature plant size in mind. A row of shrubs that looks modest at installation may narrow the path or require constant pruning later.

    Use taller planting at selected points and lower planting beside the route. Choose species for actual light, soil, drainage, climate, and maintenance capacity. Check utility locations and property rules before digging.

    5. Add vertical planting where floor width is scarce

    A stable freestanding trellis or tiered planter can concentrate planting along one edge. Leave access for watering, pruning, wall maintenance, and airflow. Attached systems require a suitable structure, permission, and installation appropriate to the load and exposure.

    Use Best Vertical Planters for Balconies and Small Patios to compare footprint, watering access, and mounting requirements.

    6. Make privacy targeted

    Screen the most direct view rather than enclosing the entire yard. One slatted panel, planter-backed screen, or carefully placed plant group may interrupt a neighbor’s sightline while preserving light and airflow.

    Boundary structures, screen heights, attachments, and planting near property lines can be regulated. Confirm ownership, permissions, local requirements, association rules, and utility access. The privacy screen guide explains format-specific tradeoffs.

    7. Use diagonal views carefully

    Angling a chair, path edge, or planting bed can make the eye travel across the width instead of reading the yard as a corridor. The angle should not create unusable wedges or a route that is difficult to maintain.

    Test the shape with a garden hose or removable marking paint suitable for the surface before changing beds or paving. Walk the route carrying typical items and check turning space at gates and doors.

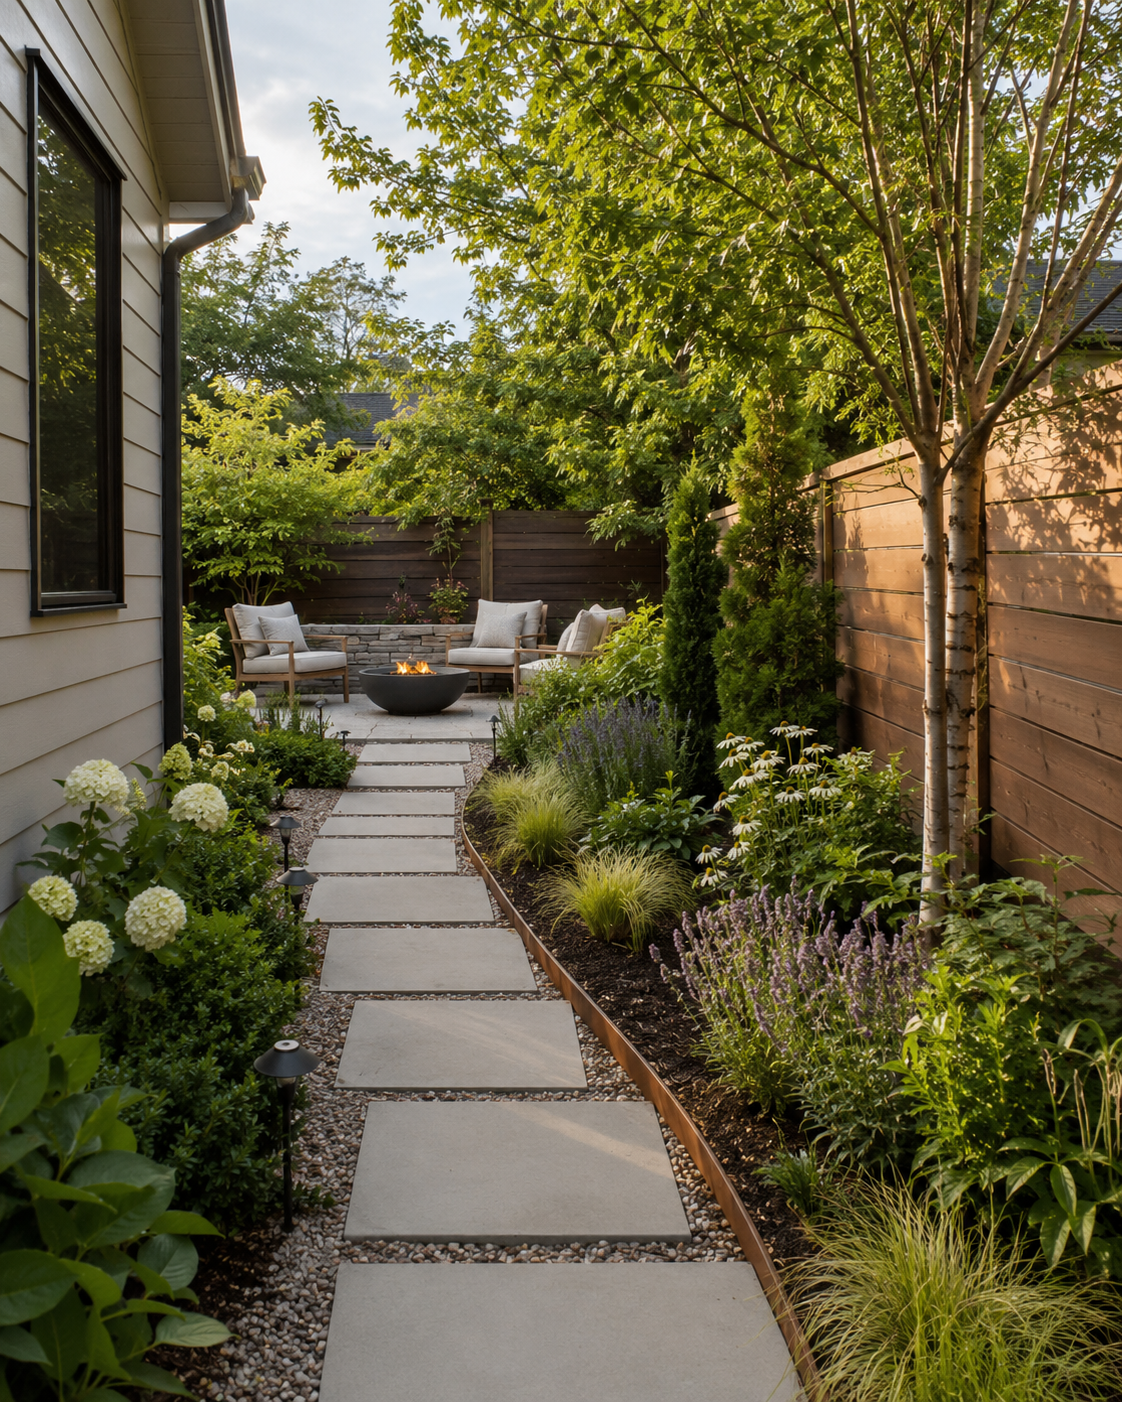
    Narrow backyard with a clear path and seating destination.

    8. Create storage that does not become a second wall

    Choose storage by the actual items: tools, hoses, cushions, or bins. A tall cabinet saves floor area but can dominate a narrow view; a low bench preserves sightlines but uses more linear space. Keep doors, lids, and drawers out of the main route when open.

    Outdoor storage should not contain items that are unsafe or unsuitable for temperature and moisture exposure. Follow product instructions and local storage rules.

    9. Keep the material palette simple

    Two primary hardscape materials are often enough for a limited yard. Repeating one edge material, planter finish, or furniture color from front to back helps separate zones feel connected. Too many borders and surface changes can shorten the view.

    Before installing paving, gravel, tiles, or edging, confirm drainage, substrate preparation, accessibility, utility access, and any permit or association requirements. Renters should obtain written permission for permanent changes.

    10. Light the route and destination

    Use low-level illumination along genuine changes in level and a softer light at the seating destination. Avoid excessive fixtures that flatten the yard or create glare for neighbors. Outdoor electrical work and permanent fixtures should follow product instructions and applicable professional or property requirements.

    A narrow-yard planning sequence

    1. Measure width at several points and mark permanent obstacles.
    2. Protect required access, drainage, utilities, and gates.
    3. Choose one main destination and one continuous route.
    4. Place the largest furniture on one side or at the far end.
    5. Build planting rhythm with mature sizes in mind.
    6. Add targeted privacy only where needed.
    7. Choose storage by contents and operating clearance.
    8. Repeat a restrained material and color palette.
    9. Test temporary outlines before permanent installation.

    For a visual reset that applies to small yards as well as patios, see Small Patio Makeover Ideas That Don’t Feel Crowded.

    The takeaway

    A narrow backyard feels intentional when the route is simple and the destination is clear. Keep one side open, concentrate furniture and storage, repeat planting rather than filling every edge, and screen only the views that need it. Measure permanent changes carefully and verify site-specific rules before installation.

  • Best Privacy Screens for Balconies and Small Patios

    The best privacy screen for a balcony or small patio blocks the specific sightline that bothers you without creating a new problem with wind, light, movement, drainage, or property rules. Start by locating the view you want to interrupt, then choose the least intrusive screen that solves it.

    Freestanding panels, planter-backed screens, approved fabric panels, slatted dividers, and plant-supported structures each have different footprints and mounting needs. No single format is best for every property, and a screen that works at ground level may be unsuitable on an exposed balcony.

    Decision factors that matter first

    • Target sightline: side neighbor, street, parking area, or lower-level walkway?
    • Location: ground-level patio, covered balcony, or exposed upper floor?
    • Available footprint: how much floor can a base or planter occupy?
    • Mounting permission: can anything attach to the building or railing?
    • Wind and airflow: will the screen act like a sail or trap heat?
    • Required access: does it affect the door, exit route, drain, or utility area?
    • Maintenance: will fabric, wood, plants, or hardware be easy to clean and inspect?

    Rules vary by building, landlord, association, lease, and local requirements. Never assume a railing, wall, ceiling, or floor can accept attachments. Confirm permissions and applicable fire, height, appearance, and egress rules before buying or installing a screen.

    Privacy screen types compared

    Screen typeBest suited forSpace tradeoffKey check
    Freestanding panelRenters needing a reversible optionBase uses floor areaStability and wind guidance
    Planter-backed screenPrivacy plus plantingUsually deeper and heavierPlacement, drainage, and intended load
    Slatted dividerPartial screening with airflowFrame and feet need clearanceApproved mounting or stable base
    Outdoor fabric panelLightweight visual screeningMinimal visual bulkPermitted attachment and wind exposure
    Retractable screenPrivacy only when neededCompact when closedInstallation surface and operating clearance
    Plant-based screenSofter, changing privacyPlanters need floor and care accessSun, water, growth, and stability
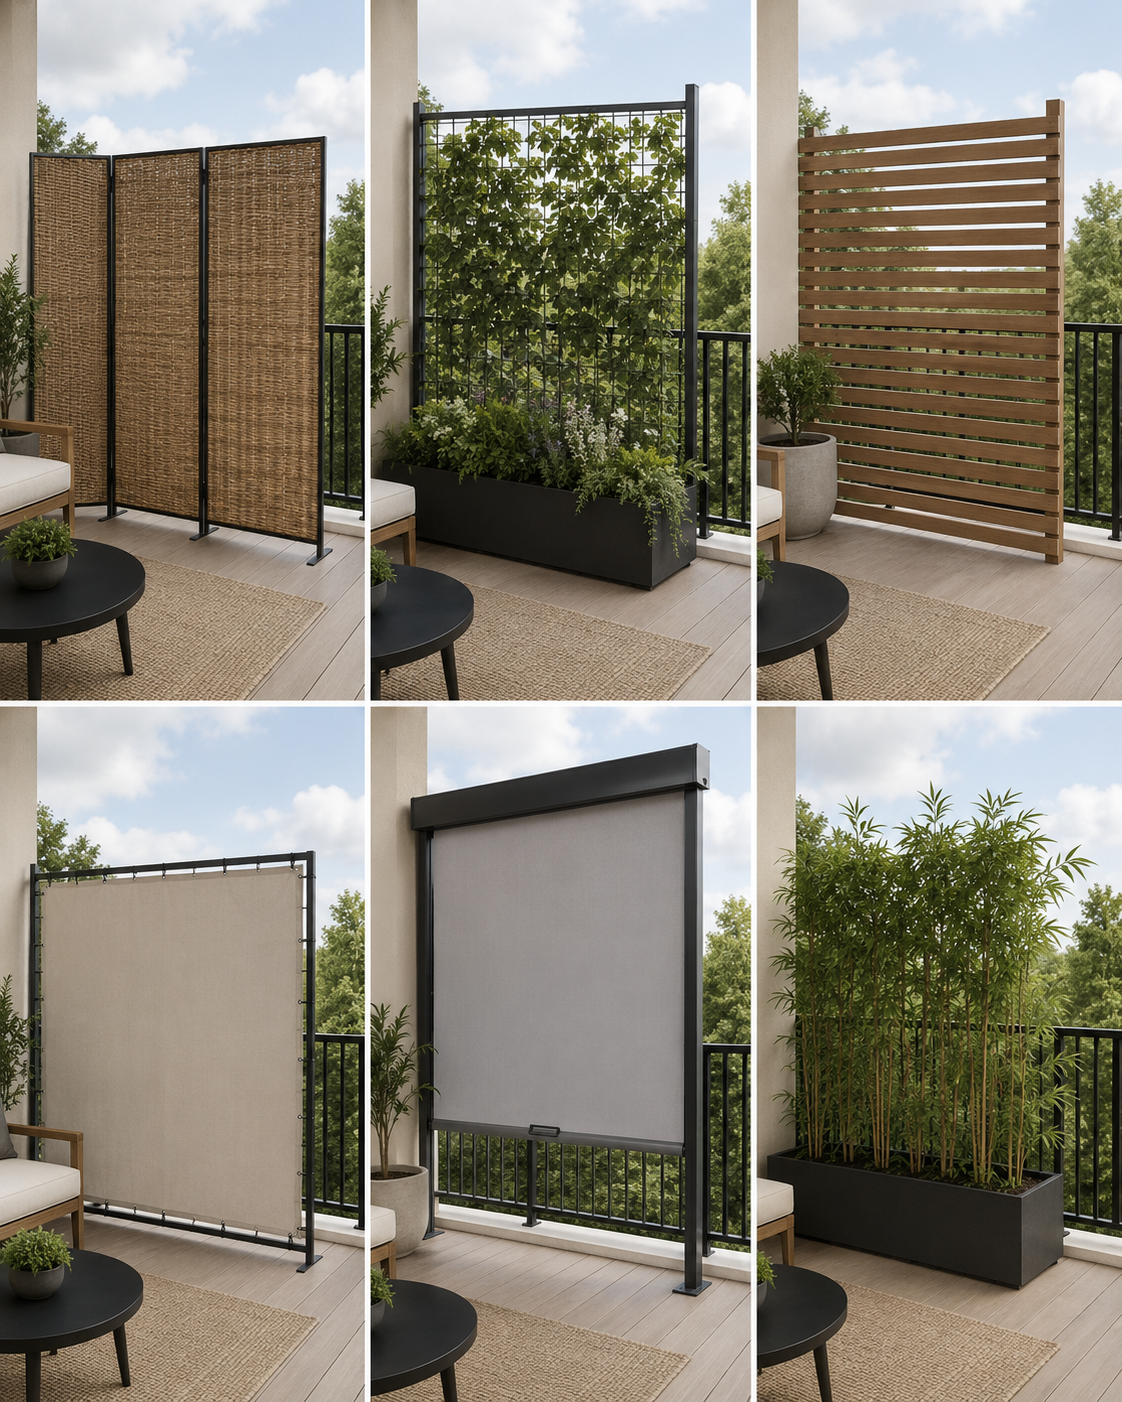
    Six privacy screen types for balconies and small patios.

    Best for renters: freestanding panels

    A freestanding screen avoids drilling when the design is genuinely stable without attachment. It can move with the furniture layout and may be stored when privacy is not needed. The tradeoff is the base: wide feet or weighted planters can consume valuable floor and create obstacles.

    Use only as directed by the manufacturer and within property rules. Do not add improvised weights, tie a panel to a railing, or rely on furniture to hold it upright. Wind exposure may make a freestanding product inappropriate for some locations.

    Best for combining functions: planter-backed screens

    A screen integrated with a planter can create privacy and a planted focal point in one zone. This format suits a patio where the planter replaces several scattered pots. On a balcony, the combined size, weight, drainage, and wind profile require careful property and product review.

    Confirm the product’s intended use and planting capacity. Wet soil and mature plants change the total load and balance. Keep drainage away from walking surfaces and neighboring property, and leave access for watering and cleaning.

    Best for airflow: slatted dividers

    Slats interrupt a direct view while allowing more light and air than a solid panel. The angle, spacing, and viewer position determine how much privacy they provide. A slatted screen may work especially well along one side rather than across the entire balcony or patio.

    Freestanding slatted units still need stable bases, and attached units require an approved structure and installation method. Wood and metal finishes have different maintenance needs, so use the manufacturer’s exposure and care guidance.

    Fabric privacy panels: light but location-dependent

    Outdoor fabric can soften a railing or open side with little physical depth. It must be specifically suitable for the intended outdoor use and attached only with an approved system. Solid fabric catches wind and may affect airflow more than an open-weave material.

    Do not wrap or cover a railing in a way that interferes with its function, drainage, inspection, or building requirements. Confirm cleaning, removal, flame-related guidance, and seasonal storage instructions.

    Retractable screens: privacy on demand

    A retractable screen preserves openness when closed and provides a larger privacy surface when extended. It can be useful between adjacent patios where a suitable installation surface exists. The mechanism, housing, anchors, and tension system make this a mounting-dependent choice.

    Measure the operating path and confirm that furniture, doors, and planters will not interfere. Use only within the product’s wind guidance and retract it when directed.

    Plant-based privacy: softer but slower

    Plants can interrupt sightlines while adding texture, but they are not instant architecture. Choose plants for actual light, wind, temperature, and watering conditions. Consider mature size, seasonal leaf loss, pruning, and the time required to reach useful coverage.

    A vertical planter may concentrate greenery more efficiently than separate pots. Compare stable formats in Best Vertical Planters for Balconies and Small Patios.

    Measure the sightline, not the whole boundary

    Sit in the primary chair and note where the unwanted view begins and ends. A narrow screen placed close to the viewer may block the same sightline as a much wider screen at the perimeter. Test the idea with a piece of cardboard held safely by another person—never leave a temporary panel unsecured.

    Mark the screen’s base on the floor, open the door, walk the route, and move the chairs. Keep drains, railings, utility access, and required exits clear. Partial privacy is often the better small-space solution because it preserves more light and movement.

    Privacy screen positioned to block one balcony sightline without blocking the path.

    Privacy without crowding the layout

    Treat the screen as part of the furniture plan. A panel behind a compact chair can create a complete retreat; a planter-backed screen may replace other pots. Avoid adding privacy after the balcony is already full.

    Use the layout and rule checks in Best Balcony Furniture for Small Spaces, then refine the overall look with Apartment Balcony Makeover Ideas That Still Leave Room to Move. Ground-level readers can also adapt the editing principles in Small Patio Makeover Ideas That Don’t Feel Crowded.

    A privacy-screen checklist

    1. Identify the exact sightline and seated or standing viewpoint.
    2. Confirm property, lease, association, and local restrictions.
    3. Choose freestanding or approved mounting based on the location.
    4. Tape the base footprint and test the door and route.
    5. Review wind, exposure, maintenance, installation, and storage guidance.
    6. Protect drainage, railing function, required exits, and utility access.
    7. Use only enough height and width to solve the privacy problem.

    The takeaway

    For a compact outdoor space, the strongest privacy screen is usually targeted rather than wall-to-wall. Choose the format by mounting permission, wind exposure, base footprint, and maintenance. Preserve the door, route, airflow, and railing function, and verify every property rule before installation.

  • Apartment Balcony Makeover Ideas That Still Leave Room to Move

    An apartment balcony makeover should make the space easier to use before it makes the space more decorated. A clear doorway, one comfortable activity zone, and a small number of deliberate details will usually feel better than furniture and planters arranged around every edge.

    Empty the balcony first. Clean the surfaces according to building guidance, mark the door and required route, and return only the pieces that support the balcony’s main purpose. This edit-first approach works for renters because many improvements can remain freestanding and reversible.

    1. Decide what the balcony is for

    Choose one primary use: coffee for two, solo reading, container gardening, or an open-air work break. A second use can be supported with a folding or movable piece. Trying to create dining, lounging, storage, and a full garden in the same narrow footprint usually leaves none of them comfortable.

    • Morning coffee: two upright chairs and one shared table.
    • Reading: one supportive chair, a movable surface, and a soft light.
    • Gardening: a slim freestanding plant shelf plus one seat.
    • Flexible use: folding furniture with a defined indoor storage location.

    If furniture is the first decision, use Best Balcony Furniture for Small Spaces to compare footprints and storage features.

    2. Protect the door and the route

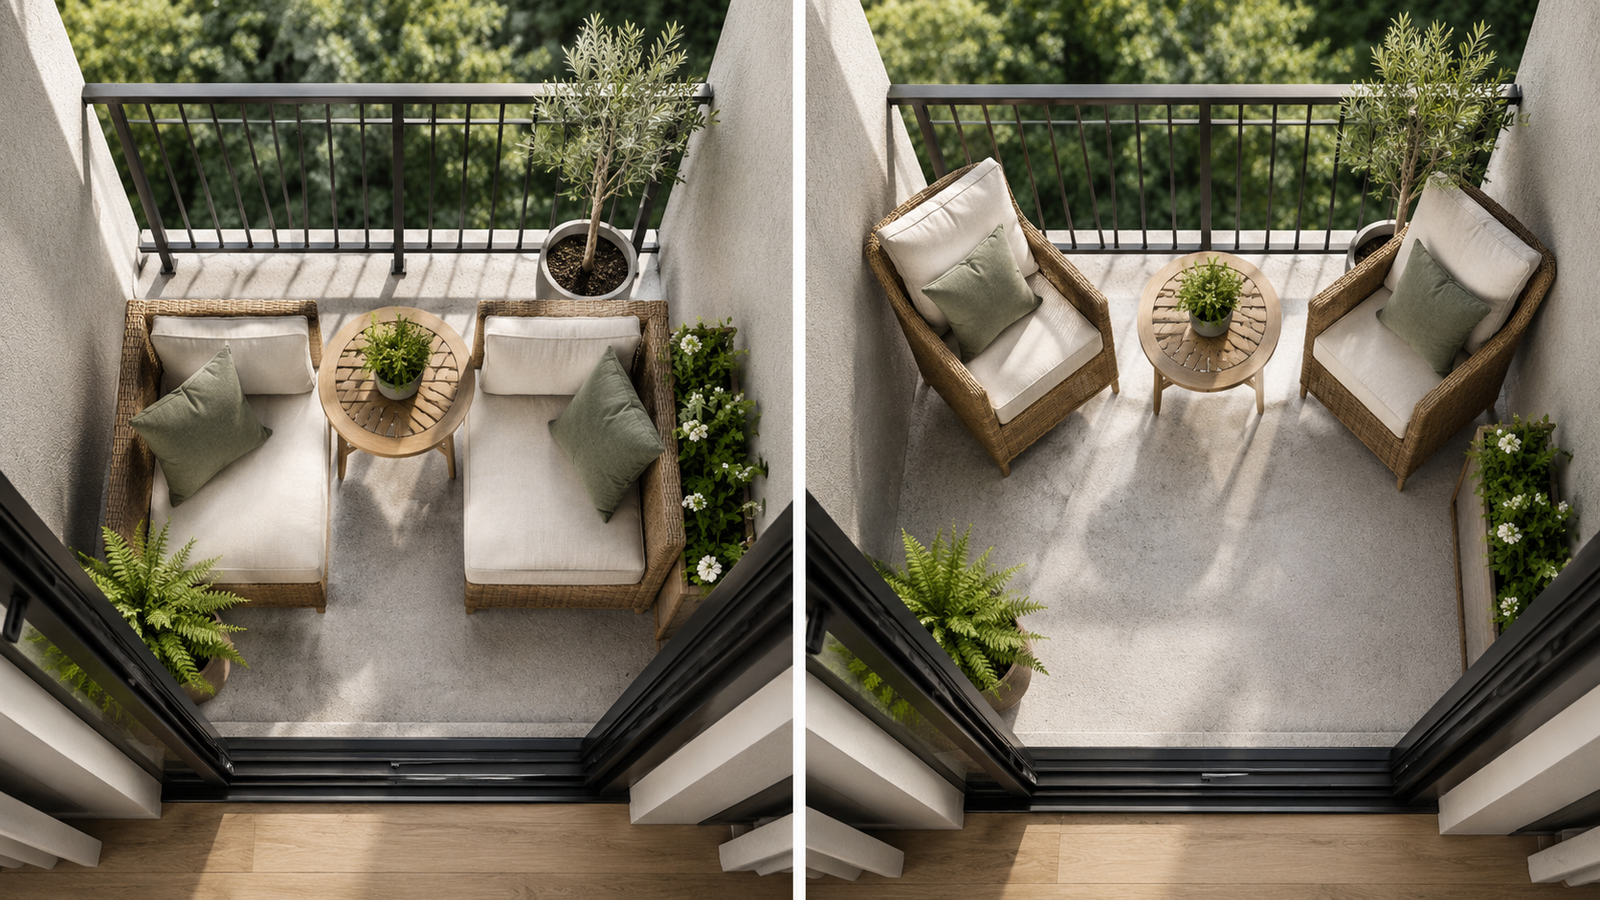
    Draw the complete door swing or sliding-door access zone. Then identify the route that must stay open for normal use and required egress. For comfortable movement, a main path around 30 to 36 inches can be useful general planning guidance where the balcony allows, but it is not a universal requirement.

    Actual requirements vary by building, property, local rules, lease terms, and association restrictions. Door operation, required exits, drains, fire rules, and building instructions take priority. Do not place furniture where it must be moved to leave the space.

    Apartment balcony rearranged to keep the doorway and walking path clear.

    3. Use one furniture group

    Place the everyday seating together rather than scattering pieces along both sides. Two chairs and one table create a complete zone. A single chair with a small stool can do the same for one person. Keep the opposite side quiet so the floor reads as open.

    Outline furniture dimensions with painter’s tape and test the layout with the door operating. Include room to pull out a chair, fold a table, or use an ottoman. Product dimensions should be checked in the fully used position.

    4. Make the floor visually continuous

    A clean, largely uninterrupted floor makes a narrow balcony feel longer. Remove scattered pots, loose tools, and extra mats. One appropriately sized outdoor rug may define the seating area when building rules, drainage, door clearance, and surface care allow it.

    Removable deck tiles can change the look more dramatically, but renters should get written permission and confirm drainage, substrate compatibility, wind, and trip edges before installation. Never cover damage or block access to drains.

    5. Move plants to one maintainable zone

    Group plants by light and watering needs instead of placing a pot in every corner. A slim freestanding shelf can use vertical space without relying on the railing. Keep the shelf stable, follow its placement and loading instructions, and leave room to water and clean behind it.

    Railing planters are not automatically appropriate for every balcony. Use only attachments designed for the specific railing and permitted by the building, lease, or association. Never improvise fasteners or place objects where they could fall.

    Compare freestanding, wall-supported, pocket, and tiered formats in Best Vertical Planters for Balconies and Small Patios.

    6. Add privacy without turning the balcony into a wall

    Place privacy where it is needed most—often one side facing a neighboring balcony or a lower section facing a walkway. A partial screen can preserve light and airflow while reducing direct sightlines.

    Use freestanding or properly approved systems only. Wind loads, attachment permissions, fire rules, railing function, and maximum permitted height vary by property. Our privacy screen guide explains the main formats and tradeoffs.

    7. Repeat a small color palette

    Choose one base color, one natural material, and one accent. For example, charcoal metal, warm wood tones, and muted green textiles. Repetition creates cohesion without adding objects. Use the same planter finish twice rather than collecting many unrelated containers.

    This principle also makes photographs stronger: one clear seating vignette, one planted vertical edge, and open floor produce more useful future pin compositions than decoration distributed evenly around the balcony.

    8. Light the activity, not every corner

    A compact rechargeable outdoor lamp can provide task light without adding permanent wiring. Outdoor-rated string lights or wall fixtures should be used only with suitable supports, permitted installation, and manufacturer instructions. Keep cords and connections out of the route and protected as directed.

    Avoid relying on candles where building or fire rules restrict open flames. Battery-operated lights can create a similar glow with fewer placement complications.

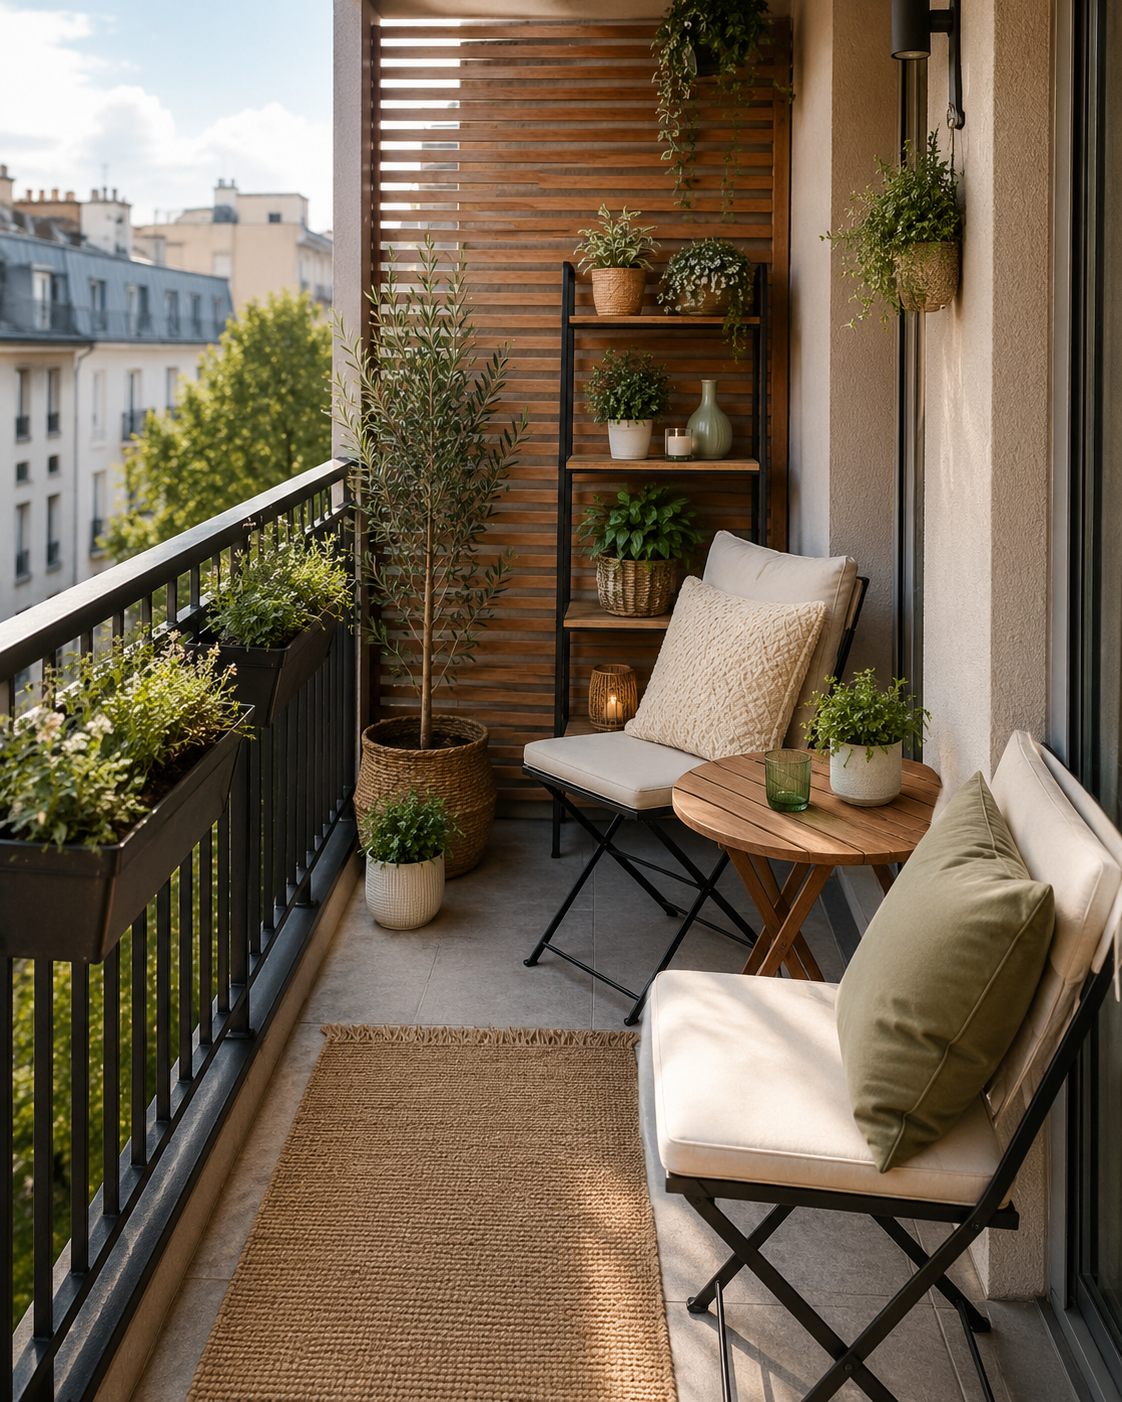
    Narrow apartment balcony makeover with open walking space.

    9. Give every loose item a home

    Keep watering tools, clips, cushions, and cleaning supplies from becoming permanent floor clutter. A small indoor basket may be more practical than adding outdoor storage furniture. If a bench or box is necessary, confirm that it fits the route and opens completely.

    Do not store temperature-sensitive, hazardous, valuable, or moisture-sensitive items outside unless the container and conditions are specifically appropriate.

    A renter-friendly makeover order

    1. Check the lease, building handbook, and association rules.
    2. Empty and clean the balcony without blocking drains.
    3. Mark the door, required route, and permanent obstacles.
    4. Return the minimum seating for one primary activity.
    5. Add one shared surface and test movement.
    6. Group plants in one stable, maintainable zone.
    7. Add permitted privacy only where sightlines require it.
    8. Finish with one lighting layer and a restrained color accent.
    9. Photograph the view from indoors and remove visual clutter.

    For related editing principles that also work at ground level, see Small Patio Makeover Ideas That Don’t Feel Crowded.

    The takeaway

    A balcony feels larger when the purpose is obvious and the route is effortless. Build one furniture group, concentrate plants and privacy where they solve real problems, and leave visible floor between the door and seating. The makeover succeeds when the balcony is easier to enter, maintain, and use.

  • Best Balcony Furniture for Small Spaces

    The best balcony furniture for a small space supports one clear activity without turning the route from the door into an obstacle course. Start with the usable floor area, the number of everyday users, and the building rules—not with a matching set.

    For many compact balconies, the strongest options are a folding bistro set, two upright chairs with a narrow shared table, one comfortable chair with a movable surface, or a slim bench approved for the location. The right choice depends on whether the priority is meals, conversation, reading, gardening, or flexible open floor.

    Begin with the balcony’s fixed limits

    Measure the clear floor dimensions, then mark the parts furniture cannot occupy: the full door swing, required exit route, drains, utility access, railings, and any area that must remain open under building or lease rules. Measure narrow points in the delivery route as well.

    Balcony requirements vary. Do not assume that a railing can carry planters, tables, privacy panels, or hanging furniture. Confirm mounting permissions, weight restrictions, fire rules, and permitted items with the building owner, landlord, association, or other applicable authority. Follow product installation and wind guidance for the specific location.

    For comfortable movement, identify a main path and keep it visibly open. A target around 30 to 36 inches can be useful general planning guidance where space allows, but it is not a universal code or property requirement. Actual requirements vary by building, local rules, lease terms, and association restrictions; required egress and door operation take priority.

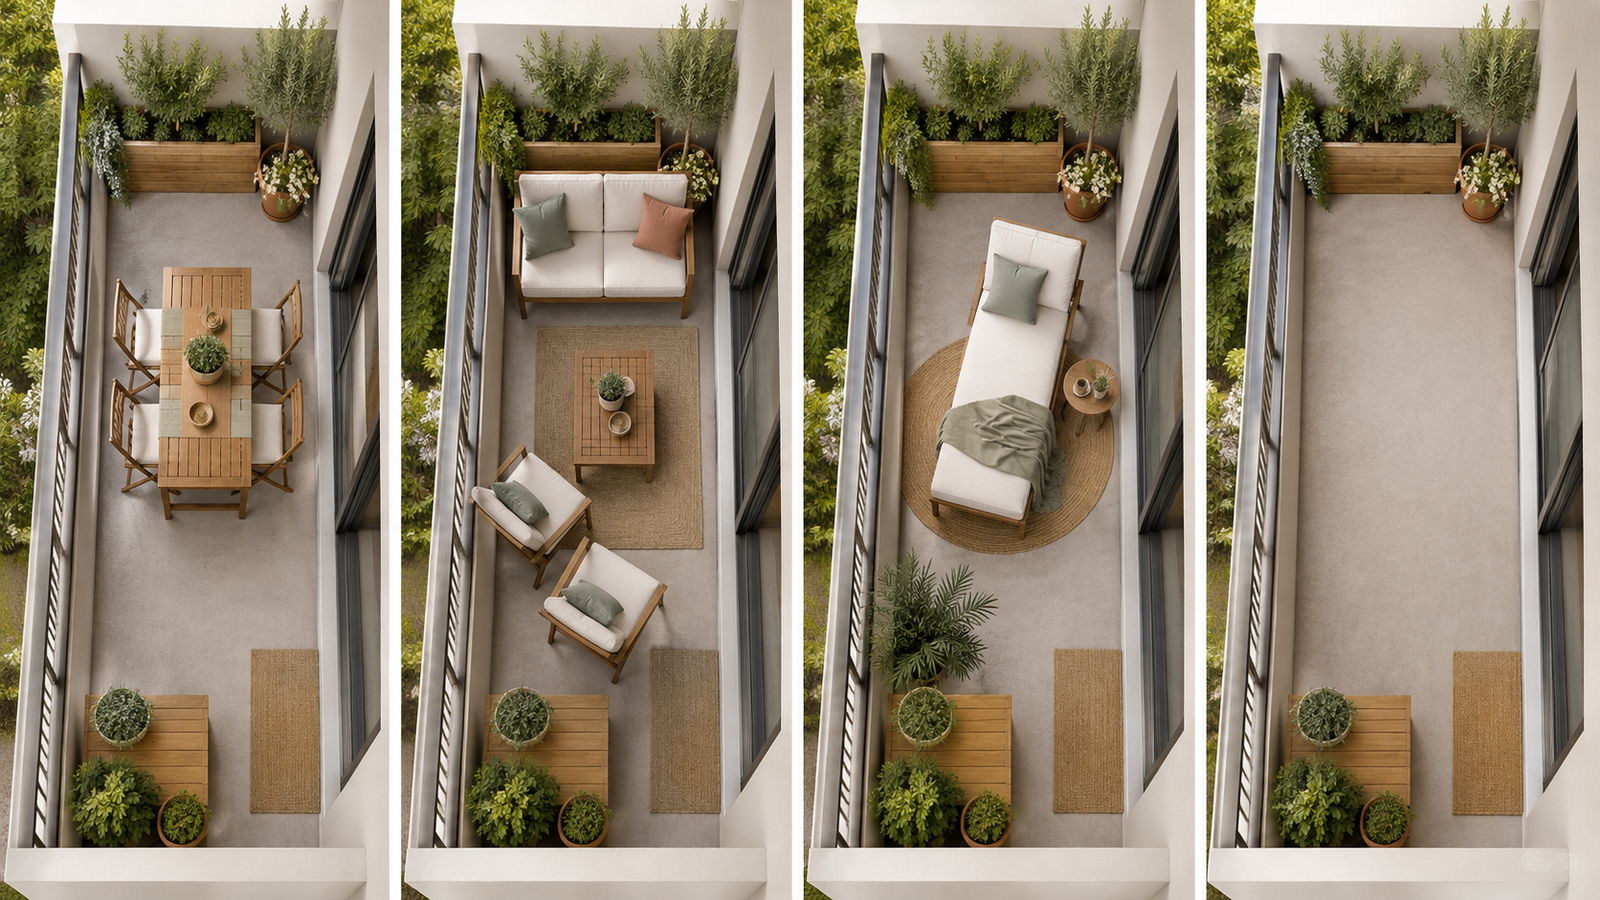
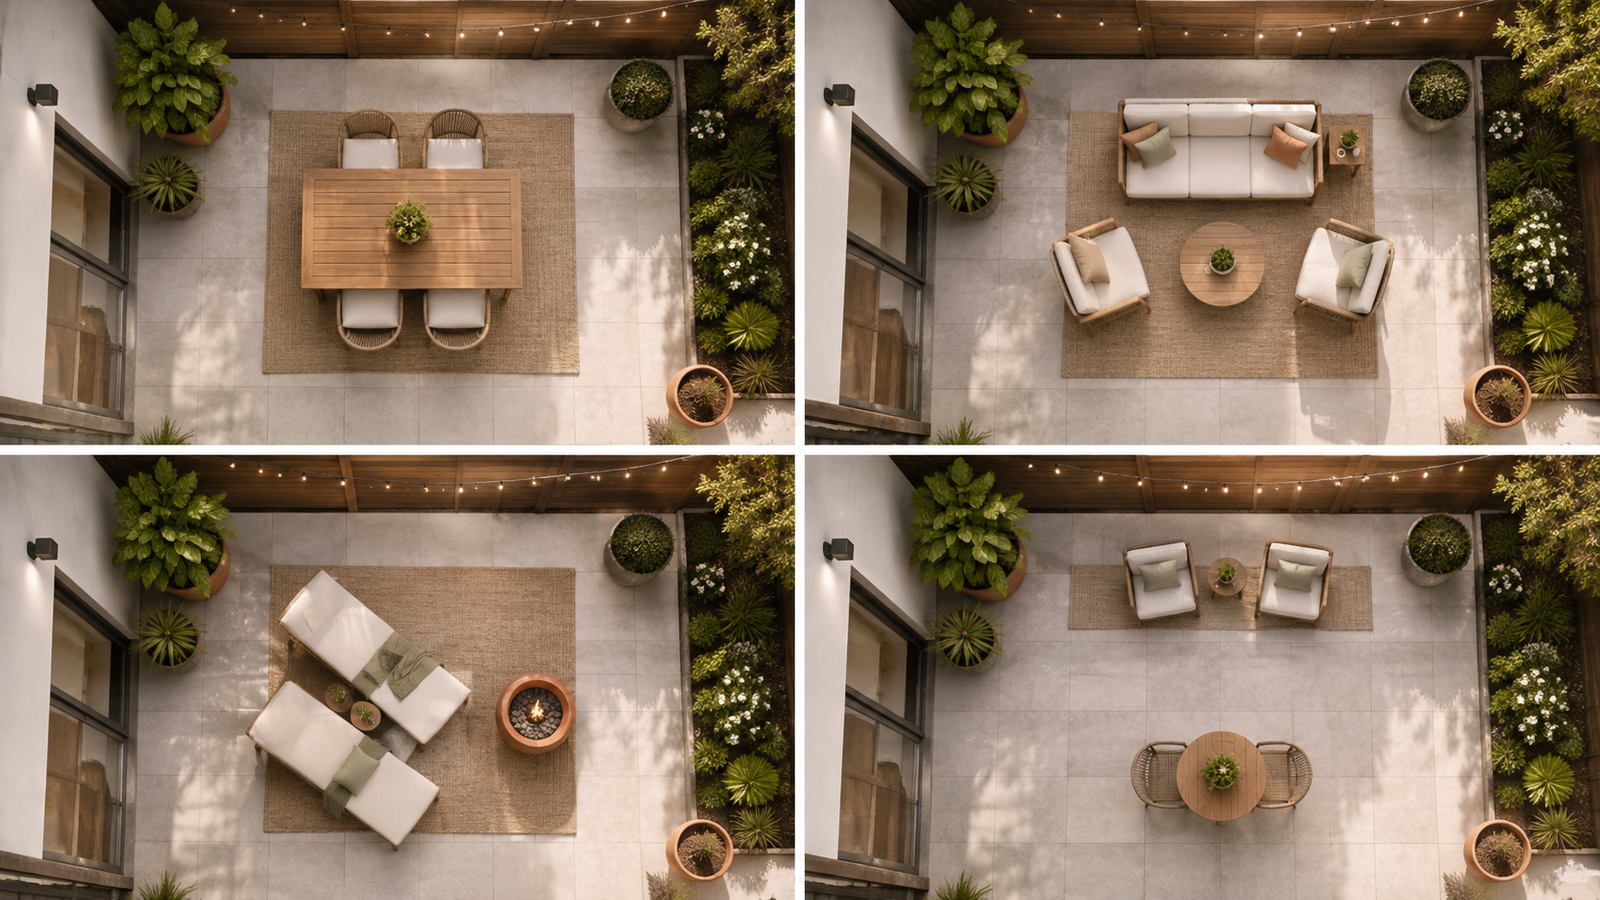
    Four furniture layouts for a narrow apartment balcony.

    Balcony furniture types compared

    Furniture typeBest suited forSpace advantageCheck before buying
    Folding bistro setMeals and flexible useFloor can be clearedStable locking and folded storage
    Two upright chairs and side tableConversation and coffeePieces can be repositionedTotal chair depth and arm width
    One lounge chair and movable tableSolo reading or relaxingPrioritizes comfort without a full setRecline and footrest clearance
    Slim backless benchOccasional seatingLow visual profileApproved use, stability, and comfort
    Nesting table setFlexible serving surfacesExtra tables share one footprintStability and stored height
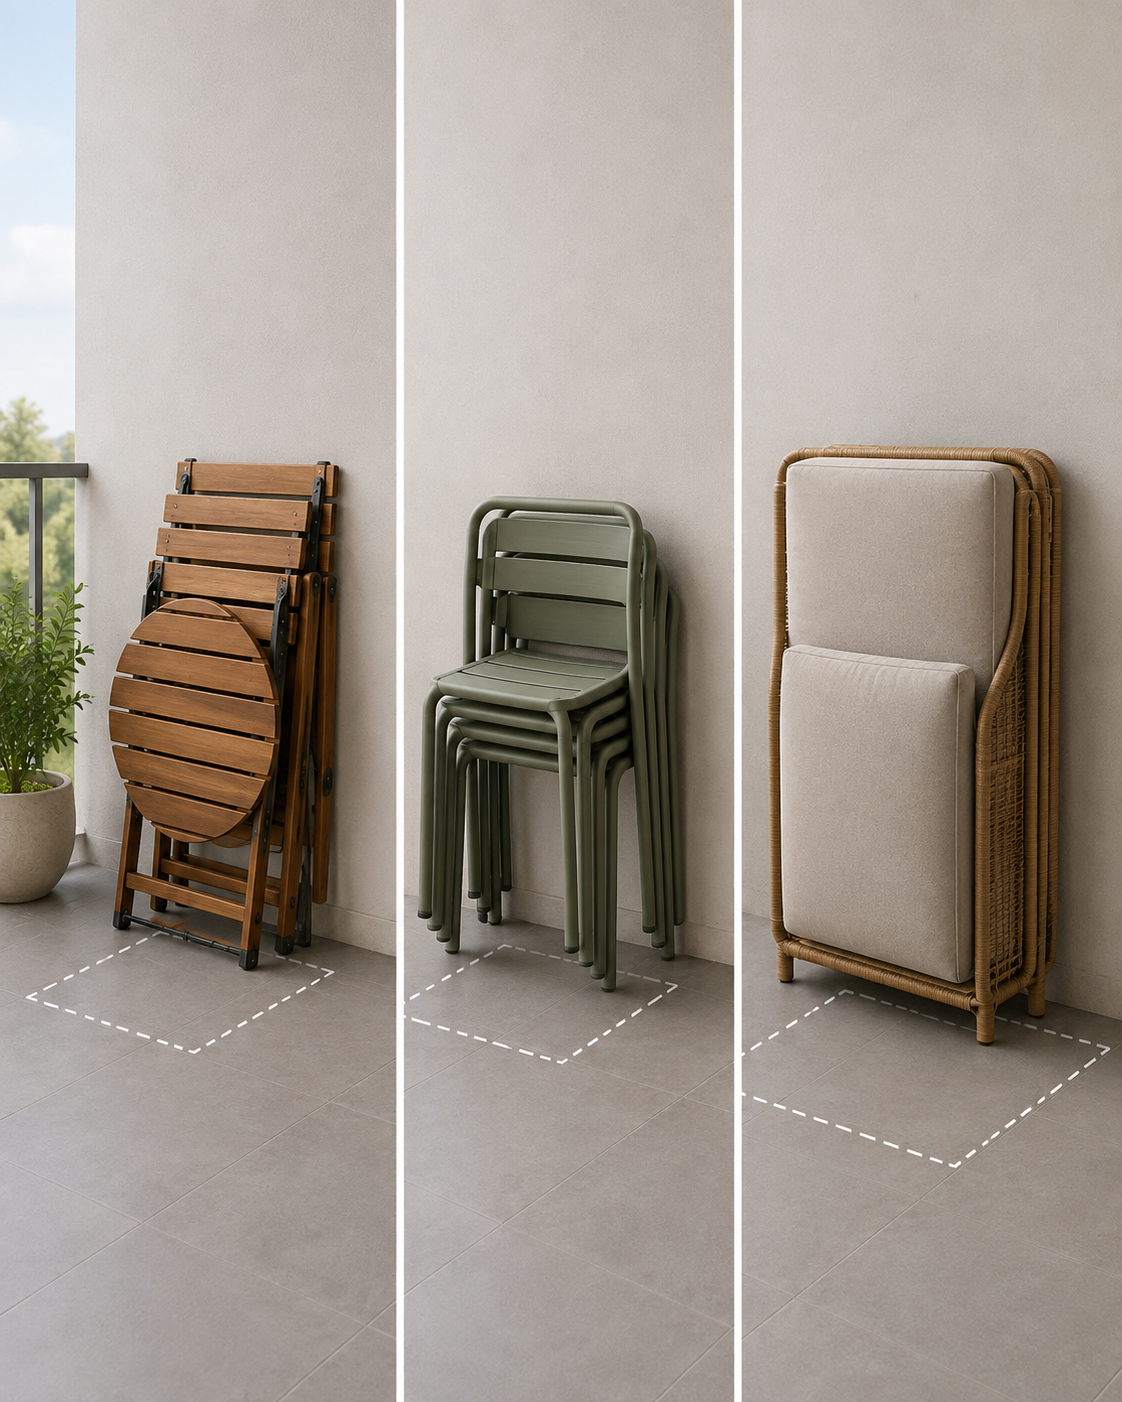
    Stacking chairsOccasional guestsConsolidated storageSafe stack height and storage location

    Best for flexible balconies: folding furniture

    Folding furniture makes sense when the balcony changes jobs during the week. A table can open for dinner and fold against an approved solid wall afterward, while one chair can stay outside and the other move to storage.

    Evaluate the furniture in both states. Confirm that hinges lock securely, folded pieces do not block the door or railing, and there is a suitable storage location. Lightweight construction is convenient to move but requires careful attention to manufacturer wind and storage guidance.

    Best for everyday conversation: two compact chairs

    Two separate chairs are often easier to fit than a loveseat because they can sit at a slight angle or move independently. Upright backs and moderate seat depth usually preserve more floor than deep lounge silhouettes. Slim or open arms reduce visual bulk.

    Place one shared table between the chairs rather than adding a coffee table and two side tables. If a coordinated set appeals to you, use the fit checks in Best 3-Piece Patio Sets for Small Spaces.

    Best for one person: a comfortable chair with one surface

    A balcony does not have to seat a group. One supportive chair, a small movable table, and an open view can be more useful than multiple compromises. Measure any reclining or rocking movement at its largest position and keep it away from required routes and railings.

    An ottoman that tucks beneath the chair or doubles as an occasional surface can add flexibility. Check whether the top is designed to hold items and whether the piece remains stable on the balcony floor.

    Tables that waste less space

    • Round tops: remove corners from tight circulation areas.
    • Square tops: can align with a solid wall when permitted.
    • Drop-leaf tables: provide a larger surface only when needed.
    • Pedestal bases: may offer flexible leg placement, though stability varies.
    • Nesting tables: add temporary surfaces without permanent extra footprints.

    Wall-mounted or railing-mounted tables require more caution than freestanding furniture. Use them only where the specific product, mounting surface, building rules, and installation method all permit it. Never improvise attachments or obstruct the railing’s intended function.

    Materials and maintenance

    Choose materials for the actual exposure rather than the indoor view. Sun, wind, rain, salt air, and temperature swings affect finishes differently. Powder-coated metal can create slim frames, wood brings warmth but often needs ongoing care, synthetic woven materials soften the appearance, and molded resin may be easy to move and clean. Performance depends on the specific construction and care instructions.

    Plan where cushions and lightweight pieces will go during severe weather or the off-season. A product that must be moved frequently should fit through the doorway without awkward lifting.

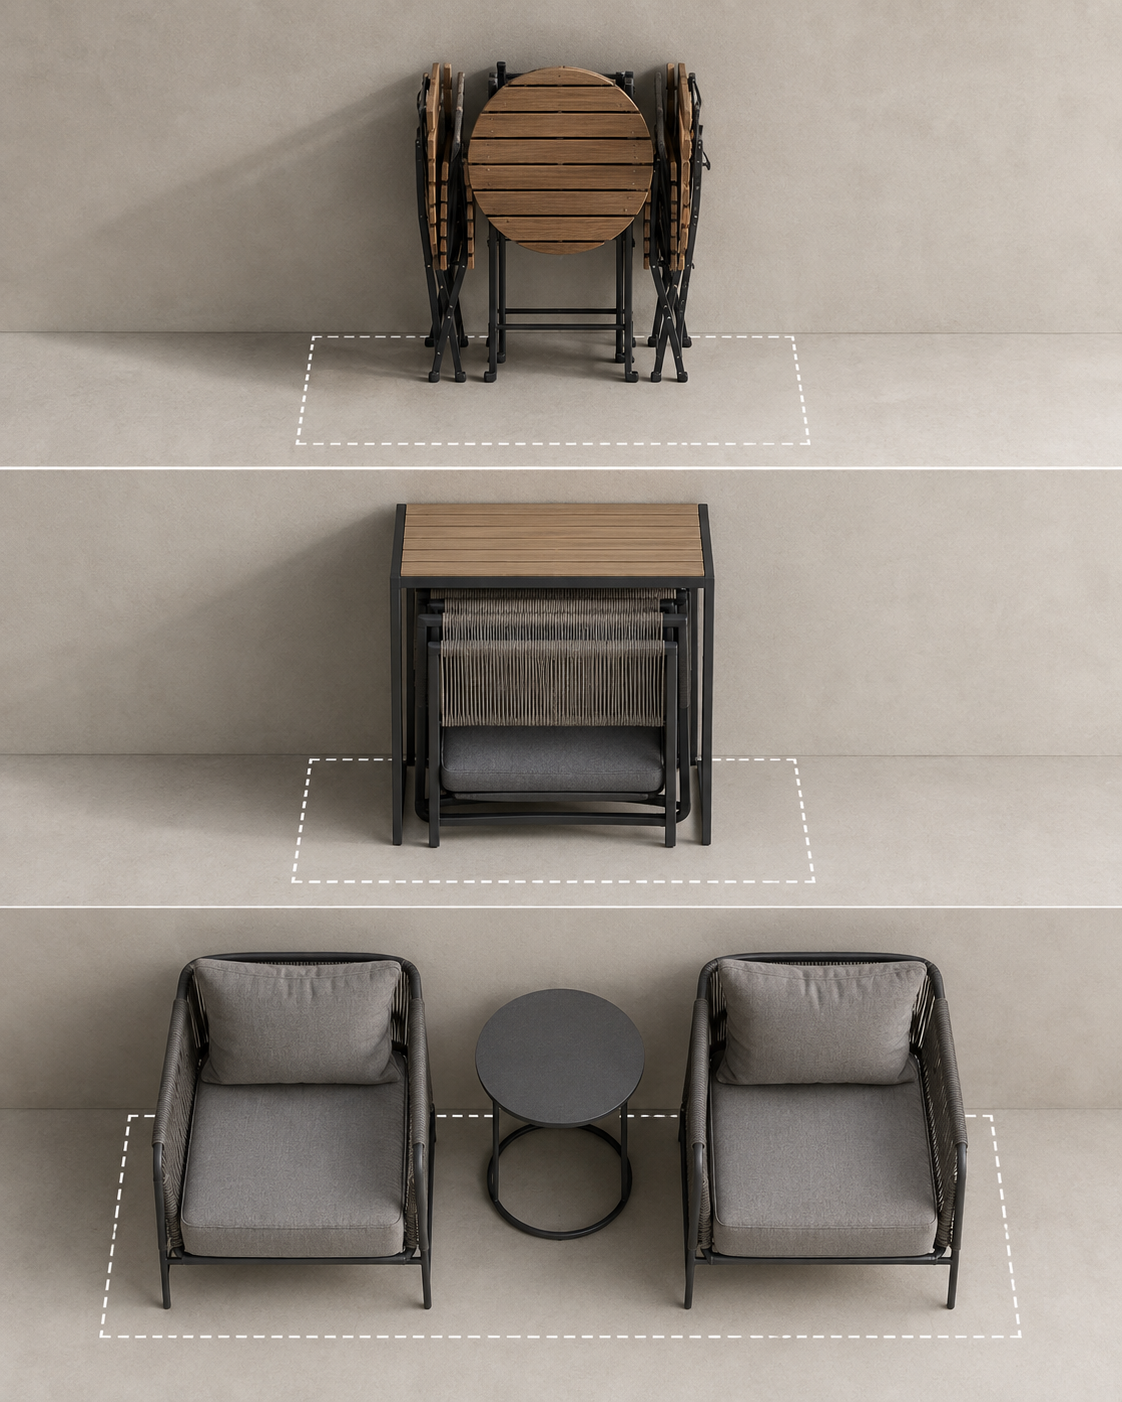
    Stored footprints of three space-saving balcony furniture options.

    Storage furniture needs a second look

    A bench or deck box earns its floor area only when it replaces clutter or another seat. Confirm that it is intended for seating if people will sit on it, and leave room for the lid or doors to open. Weather-protection claims and load limits must come from the manufacturer, not assumptions based on appearance.

    The outdoor storage bench guide explains access, ventilation, and material questions that also apply to balconies.

    A balcony furniture buying checklist

    1. Confirm the usable floor area after the door, drain, and required route.
    2. Choose one primary activity and the everyday number of seats.
    3. Record maximum width, depth, and operating clearance for every piece.
    4. Check building, landlord, association, lease, and local restrictions.
    5. Verify furniture dimensions, intended use, assembly, maintenance, and wind guidance.
    6. Map the complete layout with tape and operate the door.
    7. Plan storage for cushions, folding pieces, and lightweight items.
    8. Measure the route from delivery point to balcony.

    For visual changes that do not fill the floor, continue with Apartment Balcony Makeover Ideas That Still Leave Room to Move. If privacy is the priority, review mounting and airflow considerations in Best Privacy Screens for Balconies and Small Patios.

    The takeaway

    Buy for the balcony in use, not the folded catalog arrangement. Protect the route, choose furniture with clear jobs, and confirm every mounting or building restriction before adding pieces. Two well-scaled seats—or one excellent seat—usually create a more comfortable balcony than a complete set forced into the available floor.

  • Best Outdoor Storage Benches for Small Patios

    The best outdoor storage bench for a small patio is not necessarily the model with the largest advertised capacity. It is the bench that fits the wall, opens fully, protects the right items for its exposure, and remains comfortable enough to earn its footprint as seating.

    Start with what needs to be stored. Seat cushions, gardening hand tools, children’s outdoor toys, and grilling accessories have different requirements. A bench that is appropriate for one group may not be appropriate for another.

    Quick comparison: storage bench types

    Bench typeBest forSmall-space benefitWatch for
    Low deck box benchCushions and bulky light itemsSimple shape; may double as casual seatingSeat comfort and lid clearance
    Upright-backed storage benchRegular seatingCombines back support and storageGreater total depth and height
    Compact resin benchLower-maintenance storageOften easy to clean and moveConstruction and stability vary
    Wood storage benchWarm, furniture-like appearanceCan anchor the seating areaCare needs and exposure limits
    Ventilated slat benchItems that benefit from airflowVisually lighter frameNot sealed against wind-driven rain
    Backless storage benchOccasional seating below a windowLower visual profileLimited back support

    This comparison is about formats, not a ranking of specific products. Capacity claims, water protection, load limits, and materials must be checked against the current manufacturer information for each bench.

    This post may contain affiliate links. If you buy through them, Small Space Outdoors may earn a commission at no additional cost to you.

    Three current storage benches to compare

    These are non-ranked examples for three different small-patio priorities. Each listing was available when checked, but product details and availability can change. Small Space Outdoors has not personally tested these products. Measure the complete operating footprint and verify the current Amazon listing before ordering.

    For regular seating with concealed storage: Keter Storage Bench Deck Box

    Amazon’s listing combines an upright-backed bench format with storage beneath the seat. It fits a patio where one piece needs to replace both separate seating and a storage box. Measure the full bench depth, allow room for the seat lid to open, and confirm the current seating and storage instructions.

    View the Keter storage bench on Amazon.

    For a cushioned, backless format: Tangkula Outdoor Storage Bench

    The listing shows a backless deck-box format with a seat cushion and a gas strut for lift-up access. This type can work where a lower visual profile matters and there is a practical plan for cushion care. Confirm the current liner and cushion instructions, and leave enough clearance to open the lid fully.

    View the Tangkula cushioned storage bench on Amazon.

    For a compact multipurpose surface: Suncast Outdoor Deck Box

    Amazon’s listing presents this low deck box as storage that can also serve as a seat, ottoman, or side surface. It is relevant when a small patio needs a lower-profile storage piece instead of a full backed bench. Confirm the current seating guidance, make sure the lid can open in place, and match the contents to the patio’s actual weather exposure.

    View the Suncast outdoor deck box on Amazon.

    Measure the bench with the lid open

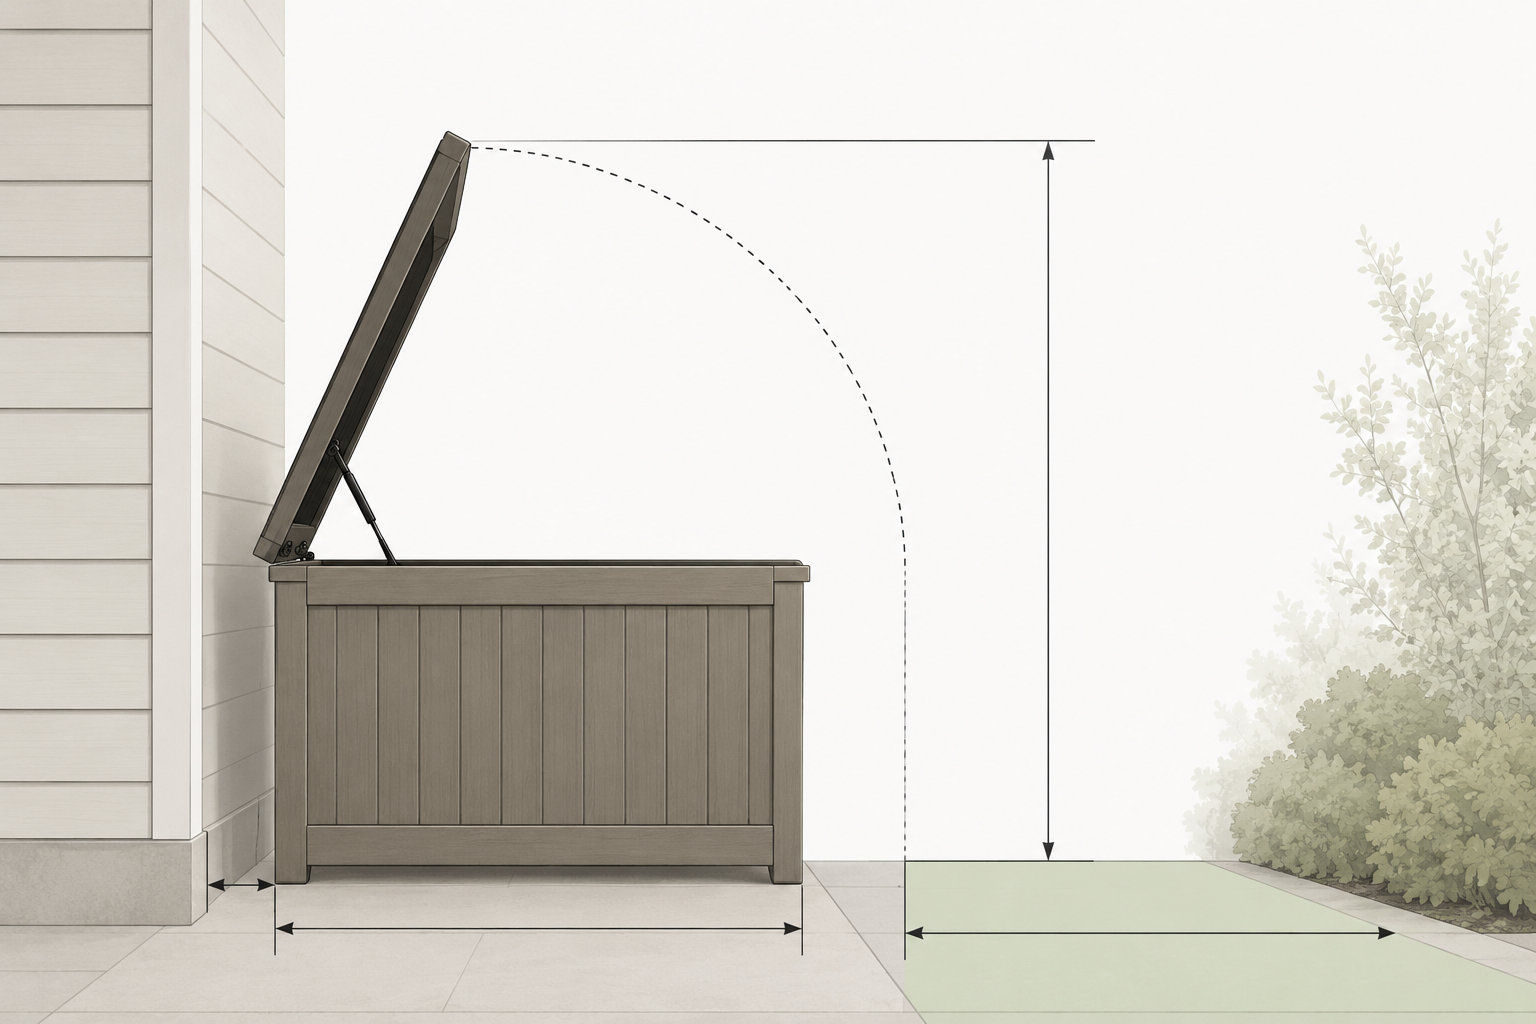
    Record the maximum width, depth, and height that the patio can accept. Then consider the operating space. Hinged lids may rise behind the bench, slide back toward a wall, or need a clear zone above. Drawers and front doors need open floor in front.

    1. Measure the proposed wall or edge.
    2. Subtract room for door trim, outlets, hose connections, rail posts, and drainage.
    3. Check the product’s complete exterior dimensions.
    4. Find the open-lid or open-door clearance in the manufacturer instructions when available.
    5. Tape the footprint on the patio and test the walking route.
    6. Confirm that stored items will fit through the opening, not just inside the cavity.

    A bench should not narrow the required exit route or make a door awkward to use. If it sits near a dining chair, test the chair pulled out and the storage open at the same time.

    Storage bench lid clearance and walking space shown from the side

    Do not treat “weather-resistant” as “waterproof”

    Outdoor storage descriptions can use terms such as weather-resistant, water-resistant, or waterproof, but those words do not automatically mean the same thing across products. Construction details, lid overlap, seams, ventilation holes, drainage, and wind direction all affect how contents fare in real conditions.

    Read the manufacturer’s use and care information. If the stored items must stay completely dry, consider a suitable sealed inner container or move them indoors. Never store electronics, important papers, chemicals, fuel, food, medication, or other temperature- or moisture-sensitive items in a patio bench unless the product and conditions are specifically appropriate.

    Ventilation matters too

    A tightly closed container can trap moisture from damp cushions or humid air. Ventilated construction may help airflow, but it can also admit dust or wind-driven moisture. Let textiles dry fully before storage and inspect the interior regularly for condensation, odors, insects, or mildew.

    Place the bench where water does not pool around its base. Keep drainage paths open and follow any floor-protection recommendations. On wood decking or a balcony surface, confirm that feet, wheels, or a mat will not trap moisture or cause damage.

    Choose a material for the actual exposure

    Resin or molded plastic

    These benches are often easy to wipe clean and may be lighter than wood or metal options. Look beyond the material label: wall construction, hinges, reinforcement, UV exposure guidance, and assembly affect performance. Lightweight pieces may require special attention in windy locations.

    Wood

    Wood can feel like indoor furniture and pair naturally with planters. It generally requires care appropriate to the species, finish, and climate. Confirm whether the bench is intended for uncovered exposure and how the manufacturer recommends cleaning, refinishing, and seasonal storage.

    Metal

    Metal frames can look slim and provide strong visual structure, but finish damage, corrosion risk, heat in direct sun, and condensation deserve attention. Check whether the storage compartment is metal or a separate liner and follow care instructions for the coating.

    Woven synthetic surfaces

    Woven exteriors can soften the appearance of a storage box, yet the weave itself does not describe the interior protection. Find out whether there is a separate shell or liner, how drainage works, and whether the construction is intended for the patio’s exposure.

    Make sure it works as a seat

    If seating is part of the reason for buying the bench, verify the manufacturer’s intended use and stated load limit. Check seat height, depth, edge shape, back support, stability, and whether the lid flexes or shifts. Do not assume every deck box is designed for sitting.

    A cushion can improve comfort but creates another item to dry and store. If the bench will be used only while putting on shoes or during occasional gatherings, a firm backless seat may be adequate. For everyday lounging, a supportive backed bench may justify its larger footprint.

    Compare that footprint with other seating in Best Patio Furniture for Small Spaces.

    Lid and hardware details worth checking

    • Soft-close or lift assistance: confirm how the mechanism works and whether it requires maintenance.
    • Child safety: follow all manufacturer warnings; storage benches are not play spaces.
    • Lock provision: a lock may deter casual access but does not make the contents safe for valuables.
    • Hinges and fasteners: check outdoor suitability and care guidance.
    • Handles or wheels: useful only if the loaded bench can be moved safely.
    • Interior shape: ribs, hinges, and sloped walls can reduce usable space.
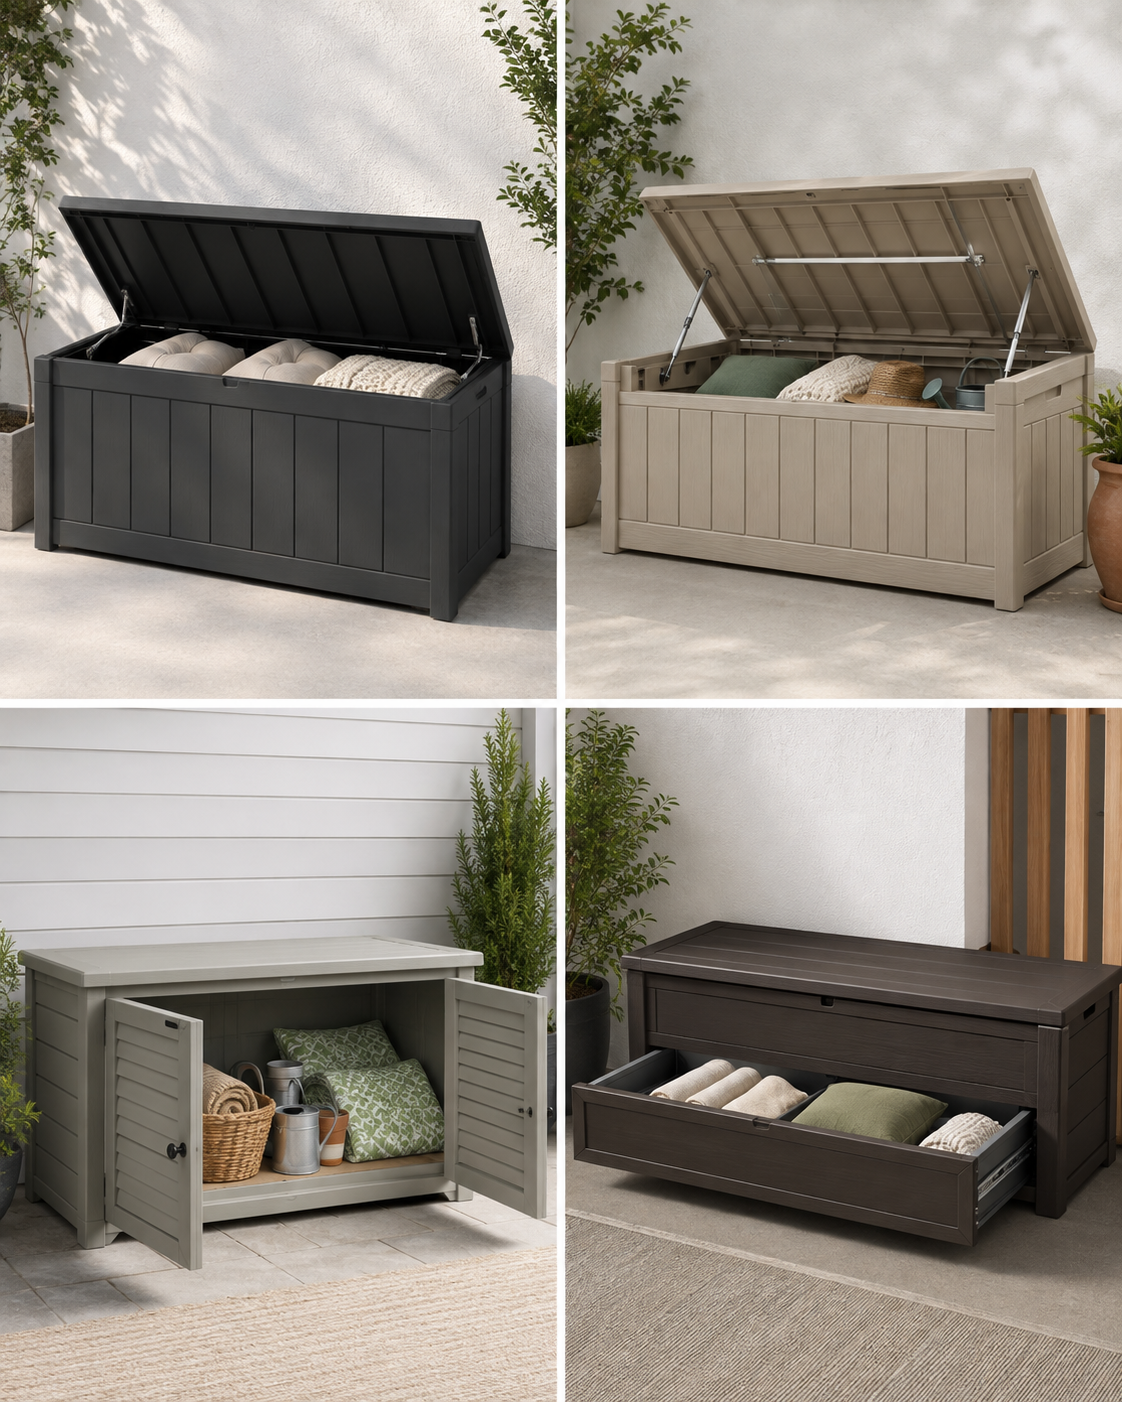
    Four outdoor storage bench access styles: hinged lid, assisted lid, doors, and drawer

    Best placement on a small patio

    Place the bench along an edge that does not carry the main walking path. A solid wall may provide a visual anchor, while a backless model may fit below a window if it does not interfere with access. Avoid locations that block vents, meters, railings, drains, or maintenance areas.

    Use the bench to replace another piece, not simply to add storage. It might take the place of two occasional chairs, a collection of loose bins, or a console. If the patio already has enough seating, a narrower vertical cabinet or indoor storage location may use the space more effectively.

    For a complete square-patio plan, see How to Arrange Furniture on a 10×10 Patio. For a less cluttered visual reset, use Small Patio Makeover Ideas That Don’t Feel Crowded.

    A final buying checklist

    • Exterior dimensions fit the taped footprint.
    • The lid, doors, or drawers can open fully.
    • The opening and interior shape fit the intended items.
    • The manufacturer describes the bench as suitable for the planned seating use, if applicable.
    • Weather and water-protection language matches the exposure and storage needs.
    • Ventilation and drainage are appropriate for the contents.
    • Materials and maintenance requirements suit the climate and available care.
    • The empty and loaded bench can be assembled, delivered, and positioned safely.
    • Building, lease, balcony, and egress rules are satisfied.

    The takeaway

    For a small patio, choose a storage bench by access and function before capacity. Measure the open lid, understand the limits of weather protection, plan for ventilation, and confirm that the product is actually intended for seating. The right bench replaces clutter or another piece of furniture; it does not create a new obstacle.

  • How to Arrange Furniture on a 10×10 Patio

    A 10×10 patio provides 100 square feet on paper, but the full square is rarely available for furniture. Door swings, steps, gates, planters, grills, and the route from the house reduce the usable area. A successful plan begins by drawing those fixed elements before placing a chair.

    Most 10×10 patios work best with one primary furniture zone: conversation, dining, or lounging. A second activity can be added with a movable piece rather than a second full set.

    Step 1: draw the patio as it really works

    Measure each edge instead of assuming the slab is exactly square. Mark the location and width of doors, stairs, railings, posts, downspouts, utility access, and permanent planters. Show the complete arc of hinged doors and the approach area for sliding doors.

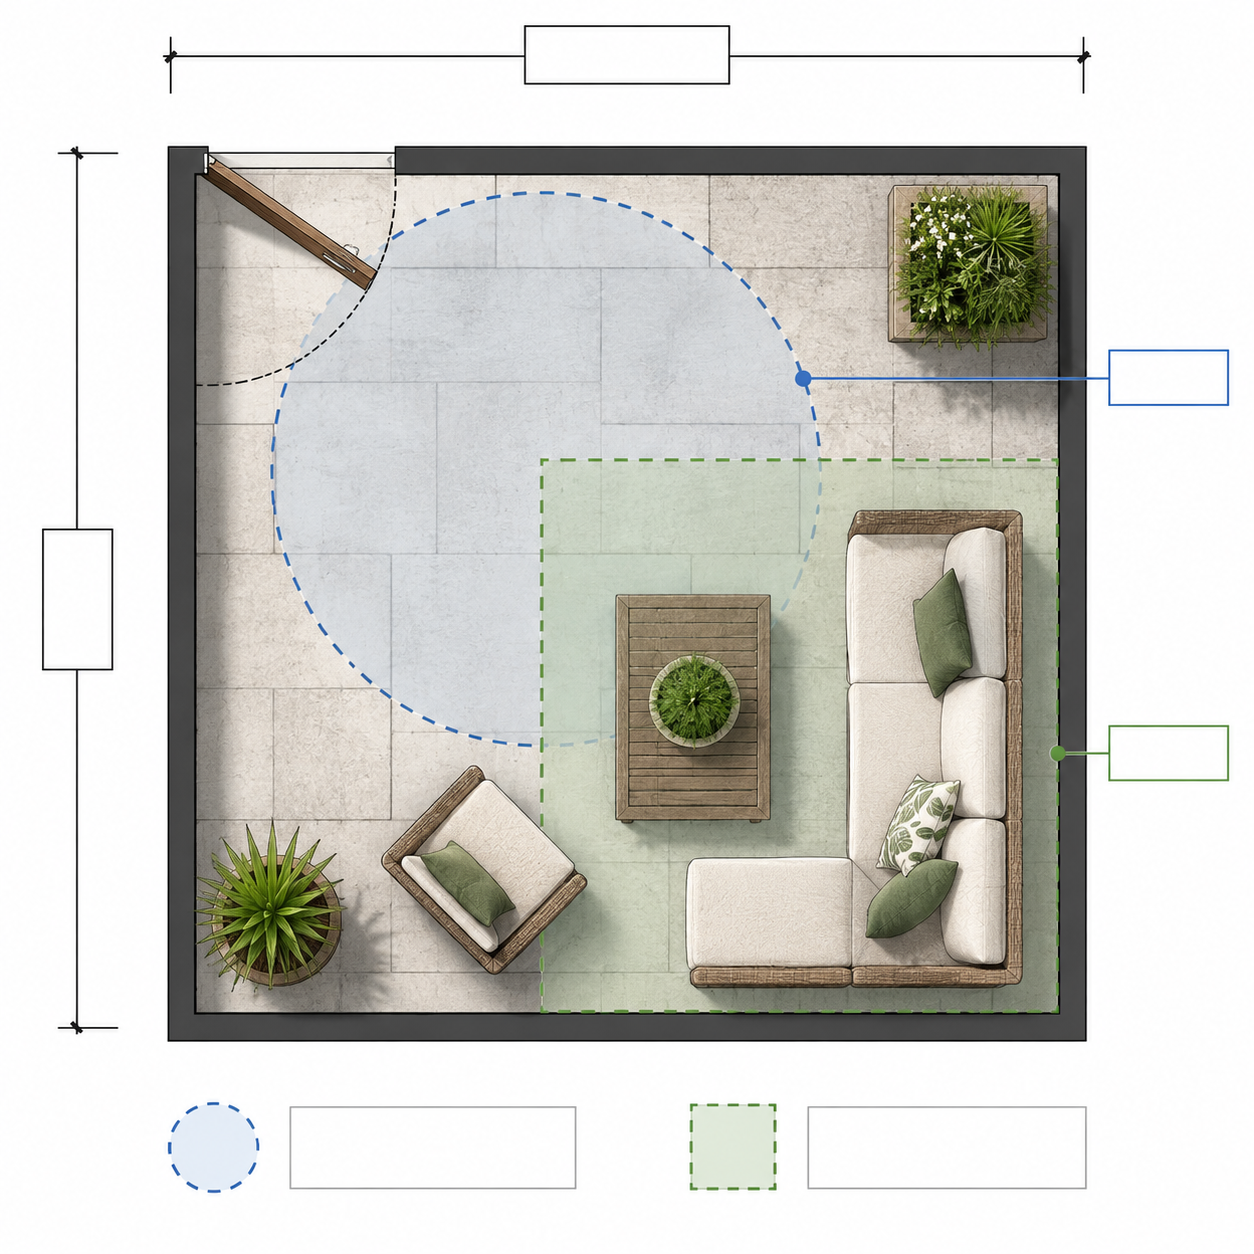
    Next, draw the walking route. For comfortable movement, a main path of roughly 30 to 36 inches can be a useful general planning target where the space allows. This is not a universal code or property requirement; actual requirements can vary by property, local rules, and lease or association restrictions. Preserve required egress, door operation, and applicable safety instructions.

    Diagram of a 10-by-10 patio with door swing, walking path, and furniture zone

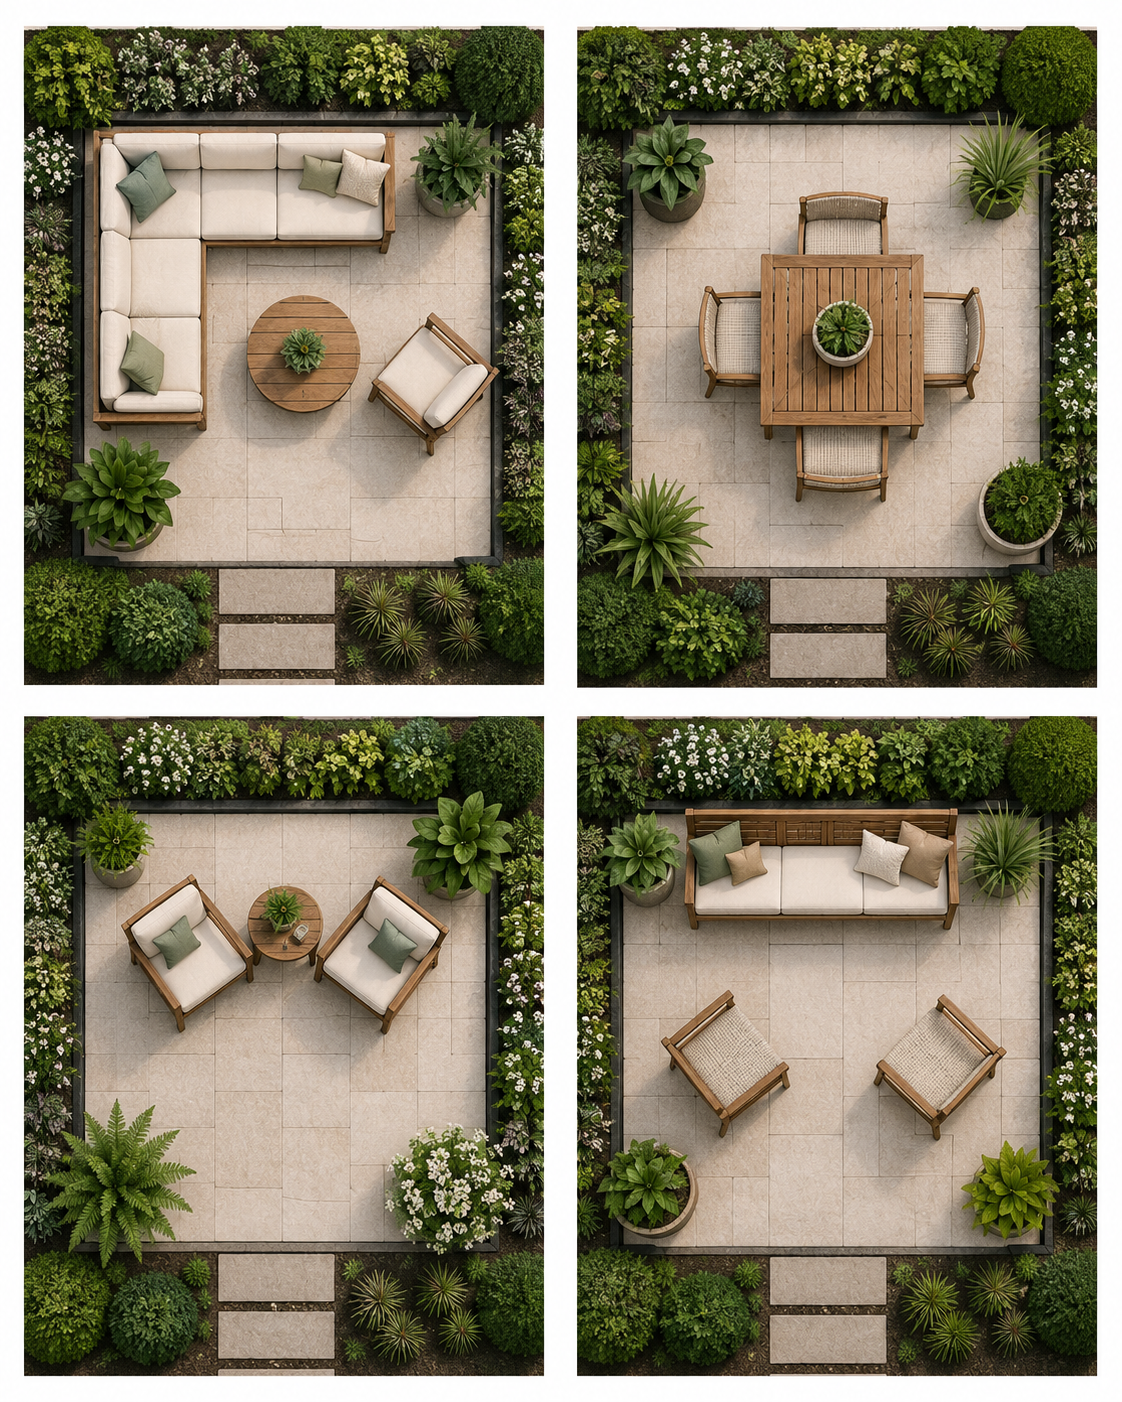
    Four layouts that fit different priorities

    LayoutCore piecesBest forKeep clear
    Conversation cornerTwo chairs, loveseat, small tableThree to four people talkingDiagonal route from door
    Dining squareCompact table, two to four chairsMeals and projectsChair pull-out zone
    Two-chair retreatTwo lounge chairs, shared side tableReading and coffeeOpen center and door route
    Bench-and-chairs planWall-side bench, two movable chairsFlexible seatingBench lid or storage access

    Layout 1: a conversation corner

    Place the largest seat along a solid edge, then position one or two chairs at a right angle or slight diagonal. Use a compact coffee table only if the route stays comfortable; otherwise, give each seating position access to a small side table.

    This layout creates a social grouping without arranging furniture on all four sides. Keep the area opposite the largest seat open so the patio does not feel boxed in. Armless or slim-arm pieces reduce width, while chairs are easier to adjust than a second sofa.

    Before choosing pieces, compare total depths in Best Patio Furniture for Small Spaces.

    Layout 2: a compact dining square

    Center a round or square table only after allowing for occupied chairs. A table that looks small can still create a large use zone once chairs are pulled out. If the door enters near one corner, shift the table toward the opposite side rather than centering it geometrically.

    For two people, keep two everyday chairs in place and store or fold extra seats. A pedestal table may offer flexible leg placement, while a table with four corner legs may make chair positions more obvious. Stability, comfort, and the specific product dimensions matter more than the base style alone.

    A coordinated two-chair configuration may be enough. See Best 3-Piece Patio Sets for Small Spaces for folding, nesting, café, and lounge options.

    Layout 3: a two-chair retreat

    Place two chairs on the side with the best privacy, shade, or view. Angle them slightly toward one another and use one narrow table between them. This leaves more floor visible than a complete lounge group and creates an easy route through the center.

    If chairs include ottomans, choose pieces that can tuck under the chair or table when not in use. Tape the fully extended footprint before buying. A reclining mechanism may need additional space behind or in front of the seat.

    Layout 4: a bench with movable chairs

    A bench along one edge creates a stable anchor, while two lightweight chairs can face it for conversation or move beside a table for meals. A backless bench can sit below some windows, provided it does not block access or create a climbing hazard.

    If the bench includes storage, test the lid in the exact location. It should open without striking the wall, window, railing, or a seated person. Our outdoor storage bench guide covers access and exposure questions in more detail.

    Four furniture arrangements for a 10-by-10 patio

    Clearances to test before committing

    • Main route: use about 30 to 36 inches only as a general planning target for comfortable movement where feasible; actual requirements vary by property and applicable local, lease, or association rules.
    • Dining chairs: leave enough room to pull out and stand without entering the required path.
    • Coffee table reach: test the actual distance from the seat; do not rely on appearance alone.
    • Doors and gates: operate them fully with every chair occupied.
    • Storage lids: open them completely and remove contents without moving the whole layout.
    • Reclining pieces: measure them in their largest position.
    • Grills and heaters: follow the manufacturer’s location and clearance instructions rather than a generic layout.

    Painter’s tape is more useful than a perfect digital drawing. Outline the furniture, place boxes where arms or backs will rise, and live with the pattern for a day. Carry a tray from the door, pull out a chair, and check whether someone can pass while another person is seated.

    Use asymmetry to keep the patio open

    Furniture does not need to be centered on the slab. Aligning the largest piece with one edge and leaving the opposite edge open often improves both movement and the view from indoors. The result can feel balanced through color, a planter, or a light rather than a second bulky piece.

    Keep tall planters and screens near the perimeter, but do not crowd every edge. One planted corner and one open corner create more depth than a continuous border of small pots. For visual edits that preserve floor area, use the ideas in Small Patio Makeover Ideas That Don’t Feel Crowded.

    What usually makes a 10×10 patio feel crowded

    • Buying a complete matching set before mapping the door and path.
    • Using both a coffee table and multiple side tables when one surface would work.
    • Choosing deep seating based on cushion dimensions instead of total depth.
    • Keeping extra chairs outside every day for guests who visit occasionally.
    • Spreading many small pots and decorations around all four sides.
    • Adding storage that cannot open without moving furniture.
    • Treating the entire 100 square feet as available floor area.

    A simple planning worksheet

    1. Patio width and depth: ______ × ______
    2. Door or gate location and operating area: ______
    3. Main path location and target width: ______
    4. Primary activity: ______
    5. Maximum number of everyday seats: ______
    6. Maximum footprint for the largest piece: ______
    7. Surface needed: dining table, side table, or none
    8. Storage location for cushions and occasional chairs: ______

    The takeaway

    A 10×10 patio can support comfortable outdoor living when the layout has a clear priority. Draw fixed obstacles first, protect the route from the door, and group furniture on one side rather than filling the entire square. Measure pieces in use, not only at rest, and leave visible open floor so the patio feels easy to enter.

  • Best 3-Piece Patio Sets for Small Spaces

    A three-piece patio set can be a sensible fit for a compact outdoor space because it gives two people a coordinated place to sit with one shared surface. But the label “three-piece” says nothing about the set’s footprint. Two deep lounge chairs and a wide table can need far more room than a folding bistro set.

    The best configuration is the one that fits your primary activity and still allows the door, chairs, and walking path to work. Compare total dimensions and required clearances before comparing colors or cushion styles.

    The best three-piece set types by use

    Set typeBest forWhy it saves spaceMain tradeoff
    Folding bistro setFlexible patios and balconiesPieces can be folded and movedFolded pieces still need storage
    Compact café setCoffee and light mealsSmall table and upright chairsAllow room to pull chairs out
    Nesting chair setOccasional useChairs tuck partly below the tableCheck knee room and ease of access
    Two lounge chairs plus side tableReading and conversationNo large central coffee tableDeep seats can dominate the floor
    Two stools plus high tableVery narrow footprintsSmall top and compact seatsNot ideal for every user
    Two ottomans plus low tableCasual, flexible seatingOttomans may tuck under the tableLimited back support

    This guide compares configurations rather than naming a single universal winner. Product dimensions and construction vary widely within every category, so the fit must be evaluated set by set.

    This post may contain affiliate links. If you buy through them, Small Space Outdoors may earn a commission at no additional cost to you.

    Three current sets to compare

    These are non-ranked examples for three different use cases. Each listing was available when checked, but product details and availability can change. Small Space Outdoors has not personally tested these sets. Measure the occupied layout and verify the current Amazon listing before ordering.

    For flexible storage: Grand patio 3-Piece Folding Patio Bistro Set

    Amazon’s listing identifies a round table and two chairs that fold. This configuration suits a patio or balcony that needs to shift between seating and open floor space. Confirm the folded footprint and decide where all three pieces will be stored.

    View the Grand patio folding bistro set on Amazon.

    For a compact conversation zone: Best Choice Products 3-Piece Outdoor Wicker Conversation Bistro Set

    The listing pairs two separate chairs with a shared side table that includes a storage compartment. It matches the lounge-style format when you want individual seats and a central surface without adding a sofa. Verify the complete chair depth and leave enough room to sit down and stand up.

    View the Best Choice Products conversation bistro set on Amazon.

    For lounge seating with a smaller stored footprint: Tangkula Outdoor Bistro Set with stackable adjustable-back chairs

    Amazon’s listing includes two chairs with adjustable, folding backs that can be stacked, plus a shared coffee table. This option is relevant when relaxation and stored footprint both matter. The chairs need more floor space in reclined positions, so measure the layout at the angle you expect to use.

    View the Tangkula stackable lounge set on Amazon.

    Measure for the set in use

    Do not measure only the table and chair frames. A dining chair needs room behind it when someone sits down or stands up. A reclining lounge chair needs space at its deepest position. Folding furniture needs enough clearance for hinges and moving parts.

    1. Measure the patio’s usable width and depth.
    2. Mark door swings, sliding-door access, gates, stairs, and required egress.
    3. Find the full width and depth of each product—not only the tabletop or seat.
    4. Add the space needed to pull out, approach, or recline each chair.
    5. Outline the arrangement with painter’s tape and use it for a normal day.

    For comfortable movement, a main route of roughly 30 to 36 inches can be a useful general planning target when the space permits. This is not a universal code or property requirement; actual requirements can vary by property, local rules, and lease or association restrictions. Required egress, door operation, and applicable safety instructions take priority. On a very small balcony, the correct decision may be fewer or smaller pieces rather than a tighter walkway.

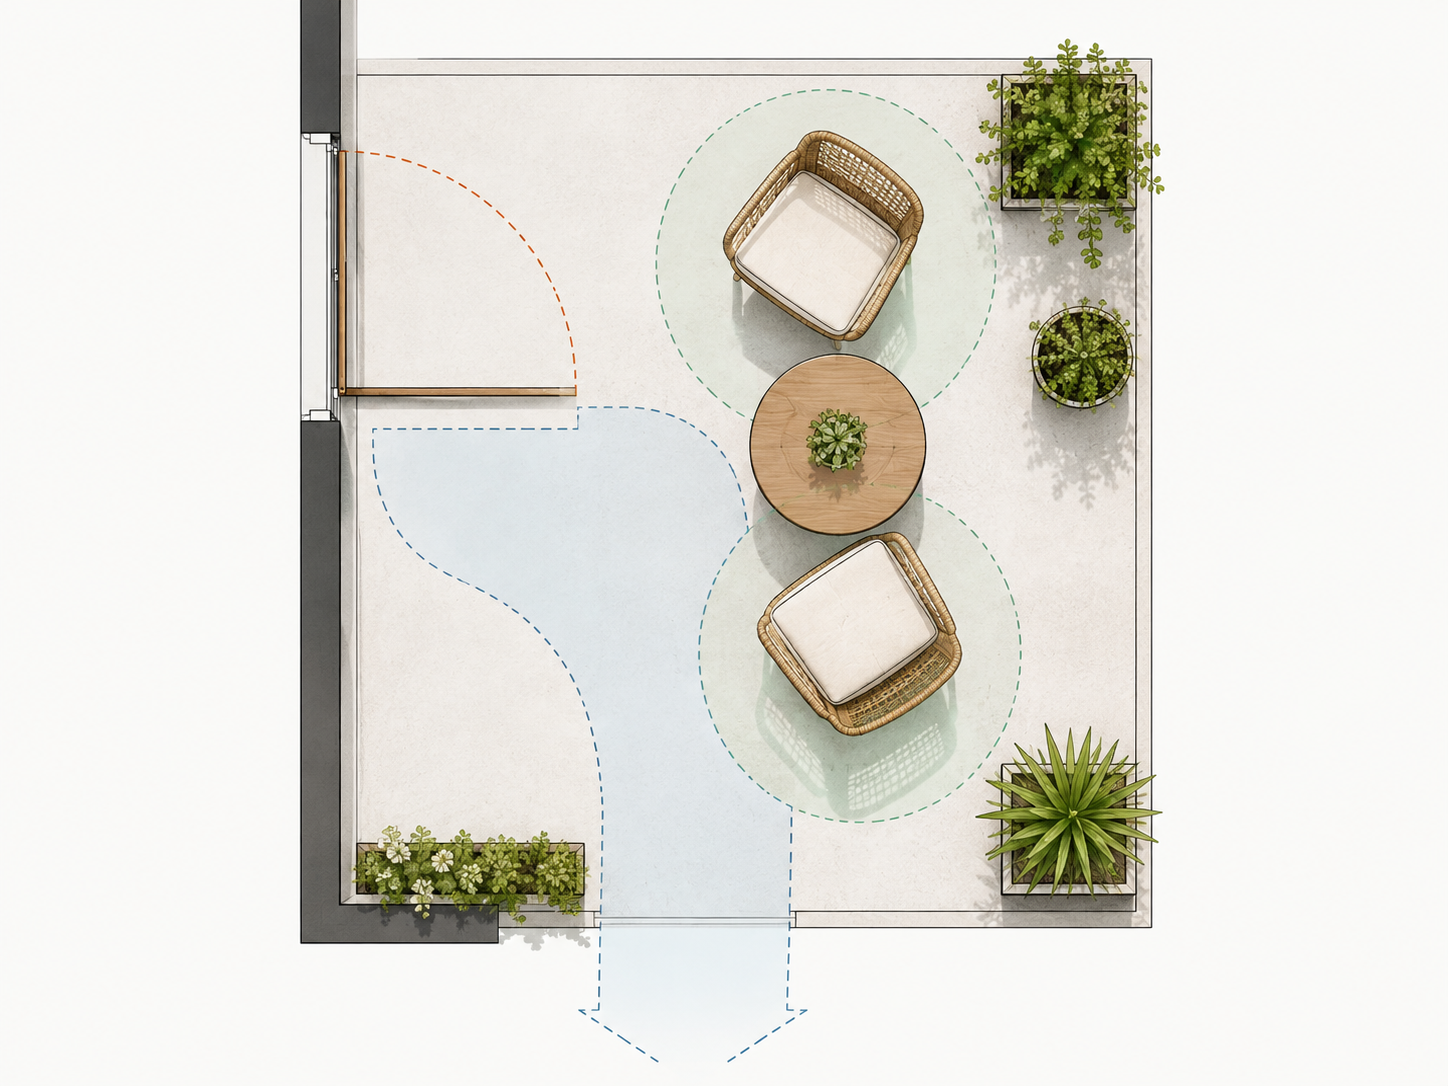
    Overhead diagram showing chair zones, door swing, and walking path around a bistro set

    Best for flexibility: folding bistro sets

    A folding set is useful when the same patio must support seating, gardening, exercise, or a clear route at different times. The table can move against a wall, one chair can be removed, or the full set can be stored during the off-season.

    Check how securely each piece locks in the open position, whether fingers are protected during folding, and whether the set stands steadily on your surface. Also decide where folded pieces will go. A folding feature does not save space if the furniture stays open all year because there is nowhere suitable to store it.

    Best for meals: compact café sets

    A café set normally pairs two upright chairs with a dining-height table. It is the most practical three-piece format for eating, writing, or working outside because the surface is closer to a conventional table height than a low side table.

    Round tops ease circulation around corners, while square tops can align neatly with a wall. A pedestal base may offer flexible leg placement, but confirm stability and follow wind guidance for exposed locations. Chairs that slide substantially under the top reduce the footprint when no one is seated.

    Best for a tidy footprint: nesting configurations

    Some three-piece sets are designed so the chairs or stools fit partly beneath the table. This can create a clean stored shape and protect more open floor between uses. Study the set in both positions: tucked away and occupied.

    A product photo may show the chairs nested tightly, but that does not reveal the room needed to pull them out or sit comfortably. Check the opening width, legroom, handles, and whether cushions must be removed before nesting.

    Best for relaxing: two lounge chairs and a side table

    This arrangement works when comfort matters more than dining. A small shared table placed between the chairs keeps the center open and provides a surface for drinks or books. Angling the chairs slightly toward each other can support conversation without requiring a full outdoor sofa.

    Total chair depth is the critical measurement. Thick backs, curved frames, reclining mechanisms, and deep cushions can enlarge the footprint. Compare the complete assembled dimensions and tape them on the floor before buying.

    For more ways to compare scale and furniture functions, read Best Patio Furniture for Small Spaces.

    When stools or ottomans make sense

    Backless seating is visually light and can tuck beneath a table, making it useful for occasional meals or entertaining. It is less supportive for long sessions and may be difficult for some people to use. A tall table with stools also changes the view and balance requirements, which matters on exposed balconies.

    Choose this format only if it suits the people who will use it most. Space efficiency is not helpful when the seating is uncomfortable or inaccessible.

    Frames, cushions, and maintenance

    Compact proportions do not eliminate outdoor-care questions. Review manufacturer guidance for exposure, cleaning, assembly, weight limits, anchoring, and storage. Powder-coated metal can create a slim silhouette, wood can add warmth, woven synthetic frames can feel relaxed, and molded resin can be easy to move. Performance depends on the specific construction and environment.

    Cushions add comfort but also require a drying and storage plan. Removable covers can simplify some cleaning tasks, yet care instructions differ. If storage is limited, a comfortable sling, woven seat, or contoured solid seat may be more practical than loose cushions.

    Stored footprints of folding, nesting, and lounge-style three-piece patio sets

    Balcony-specific checks

    • Follow the building’s rules for furniture, floor coverings, and railing clearance.
    • Do not block drainage, doors, fire access, or required egress.
    • Consider wind exposure and follow manufacturer instructions for securing or storing lightweight pieces.
    • Keep climbable furniture away from railings when children may use the space.
    • Confirm that the set’s weight and use are appropriate for the location; ask the property owner or a qualified professional when necessary.

    A final comparison checklist

    • Use: dining, conversation, lounging, or flexible use?
    • Occupied footprint: how much room does the set need while people are seated?
    • Stored footprint: do chairs fold, stack, or nest as expected?
    • Traffic: can the main route and door remain clear?
    • Comfort: do seat height, depth, arms, and back support suit the users?
    • Exposure: are materials and care requirements appropriate for the location?
    • Delivery: will packages and assembled pieces fit through the route?
    • Storage: where will cushions and lightweight components go during bad weather?

    If your patio is close to 100 square feet, test these choices against the layouts in How to Arrange Furniture on a 10×10 Patio.

    The takeaway

    For most small spaces, the strongest three-piece set is either an upright bistro arrangement for meals or two reasonably shallow chairs with a compact shared table for relaxing. Folding and nesting features can add flexibility, but only when the pieces remain stable, comfortable, and easy to store. Measure the occupied layout—not the catalog silhouette—before deciding.

  • Small Patio Makeover Ideas That Don’t Feel Crowded

    A small patio makeover works best when it improves the space you can use, not just the number of things you can see. Clear movement, comfortable seating, and one strong visual idea will usually make a compact patio feel more finished than layers of furniture and decor.

    Start by removing everything that does not need to live outdoors. Then build the space back in this order: layout, seating, useful surfaces, lighting, plants, and finishing details. That sequence keeps decorative purchases from dictating the floor plan.

    1. Give the patio one main purpose

    Choose the activity the patio should support most often. It might be coffee for two, a quiet reading spot, container gardening, or casual dinners. A clear purpose makes it easier to reject furniture that looks appealing but does not help the space function.

    • Conversation patio: face two chairs toward each other with a small shared table.
    • Dining patio: center a compact table where chairs can pull out without blocking the door.
    • Reading retreat: use one excellent chair, a footrest that tucks away, and a task light.
    • Garden-focused patio: keep the middle open and move plants to the perimeter or a vertical support.

    If furniture is the first purchase, use the measuring framework in Best Patio Furniture for Small Spaces before choosing a set.

    2. Protect the route from the door

    The most important line in a small patio is often the route from the home to the seat, gate, stairs, or grill. Keep that path visually obvious. Avoid placing a coffee table directly in the doorway or forcing people to turn sideways around a chair.

    For comfortable movement, a main path of roughly 30 to 36 inches can be a useful general planning target when the footprint allows. This is not a universal code or property requirement; actual requirements can vary by property, local rules, and lease or association restrictions. Door operation, required egress, and applicable safety instructions take priority.

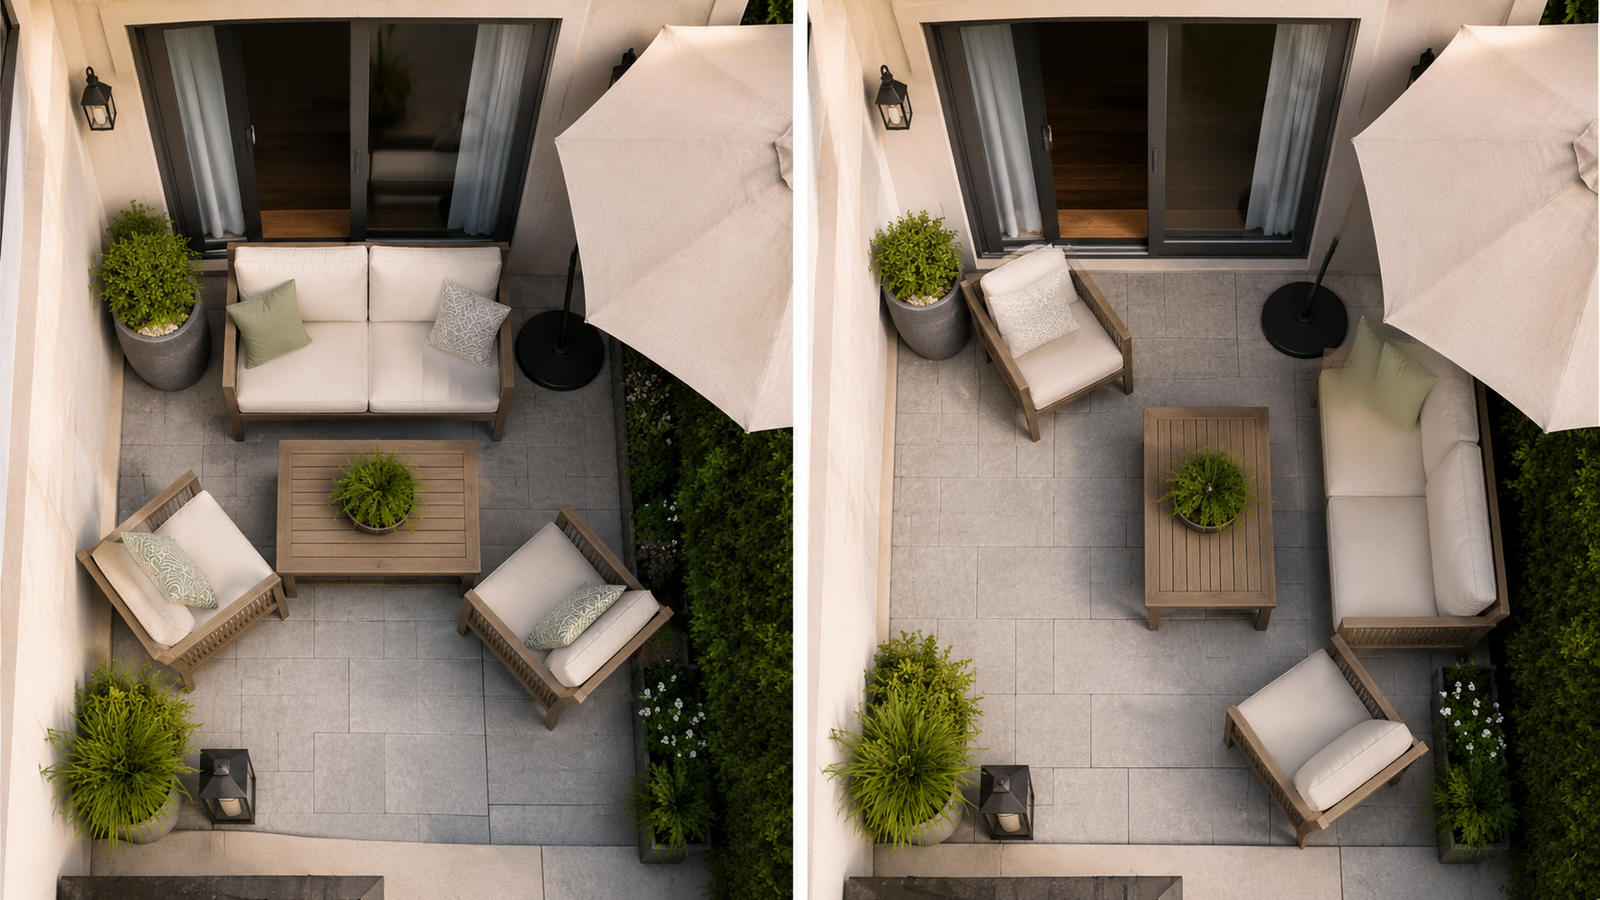
    Small patio before and after rearranging furniture to clear the doorway

    3. Create more floor by using the edges

    Move the largest piece toward a wall, railing, or solid boundary when that position is safe and comfortable. A bench against a wall or two chairs tucked into opposite corners can leave a larger open center than furniture floating randomly in the middle.

    Do not push furniture against siding that needs ventilation or access. Leave room for cushions to dry, doors to open, and maintenance areas to be reached. On balconies, never attach or lean items in a way that compromises railing safety.

    4. Replace several small pieces with one useful piece

    Three tiny tables can create more visual noise than one narrow table with enough surface for two drinks and a book. Several plant stands can be replaced by a single tiered shelf if the shelf is stable and suitable for outdoor use. A properly chosen storage bench may replace loose bins and occasional seating.

    The key is genuine usefulness. Multi-purpose furniture is not a win if the storage is difficult to access or the seat is uncomfortable. See Best Outdoor Storage Benches for Small Patios for a practical fit checklist.

    5. Use a restrained color plan

    Choose one base color, one natural material, and one accent color. For example: warm gray frames, wood-toned planters, and rust-colored cushions. Repeating those elements makes mixed furniture feel connected without requiring a matching collection.

    Light colors can keep large surfaces from feeling heavy, but they are not the only option. A dark chair can work beautifully when the surrounding floor and walls are quiet. Consistency matters more than a rule that every small space must be pale.

    6. Add softness without filling the floor

    Outdoor cushions, one washable throw, or a compact rug can make a hard-surfaced patio feel comfortable. Keep textiles limited enough that they can be stored or dried easily. A rug should lie flat, suit outdoor exposure, and avoid trapping persistent moisture against the surface below.

    If a rug would complicate drainage or maintenance, skip it. Repeating cushion colors and adding a single larger planter can create the same sense of cohesion while leaving the floor easier to clean.

    7. Move planting upward—but keep it maintainable

    Vertical planting can free floor area when the support is appropriate for the location. Consider a slim freestanding ladder planter, railing-safe planters approved for that use, or wall-mounted containers installed with permission. Match plants to the patio’s actual sun, wind, and watering conditions.

    Leave enough space to water, prune, and clean behind every container. A living wall that is hard to reach quickly becomes a maintenance problem. Grouping a few pots by light and watering needs is often more practical than scattering many individual containers.

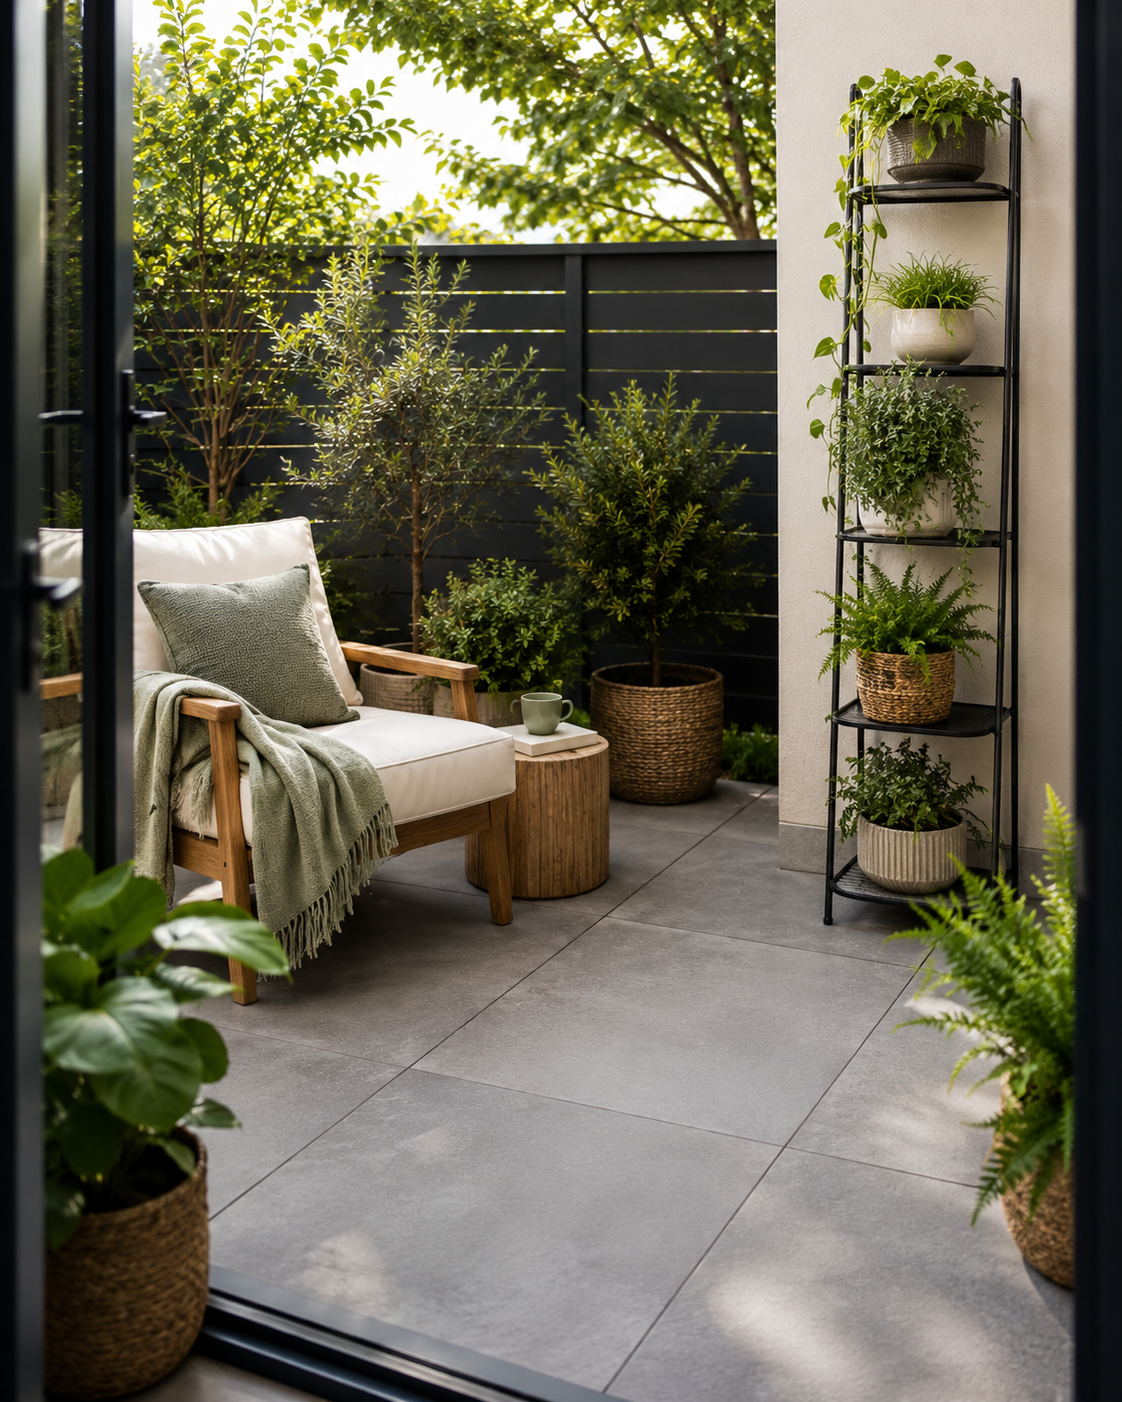
    Vertical plant shelf beside a lounge chair on a small patio

    8. Layer lighting above the floor

    Use light to define the seating area without adding another large object. Options may include a wall-mounted fixture installed by a qualified person, outdoor-rated string lights attached to appropriate supports, or a compact rechargeable table lamp that can be brought inside.

    Use only products rated for their intended outdoor location and follow installation instructions. Keep cords out of walking paths, protect connections as directed by the manufacturer, and follow lease or association rules.

    9. Make one corner the visual anchor

    A patio feels calmer when the eye has somewhere to land. Create one focal area with a handsome chair and planter, a small dining table beneath a light, or a bench backed by a simple screen. Let the other corners stay quieter.

    This is especially useful for Pinterest-friendly styling: one strong composition photographs better than decorations spread evenly around the perimeter. It also makes seasonal updates easier because the base layout can stay in place.

    10. Try a renter-friendly surface refresh

    Clean the existing surface thoroughly before covering it. If permitted, outdoor-rated deck tiles can visually define a zone, but they must be compatible with the substrate, drainage, door clearance, and lease terms. Never cover damage or create a trip edge.

    Lower-commitment alternatives include a suitable outdoor rug, coordinated planters, or a narrow doormat that does not interfere with the door. Renters should get written approval before drilling, painting, or installing anything attached to the building.

    A one-afternoon makeover order

    1. Empty the patio and clean the floor, railing, walls, and furniture.
    2. Mark the door swing and main walking path with painter’s tape.
    3. Return only the seating needed for the patio’s primary activity.
    4. Add one right-sized surface for drinks, meals, or gardening.
    5. Group plants at the edge according to light and watering needs.
    6. Add one lighting layer and one restrained textile or color accent.
    7. Photograph the layout from the doorway and remove anything that interrupts the view or path.

    For a square patio, compare these ideas with the measured layouts in How to Arrange Furniture on a 10×10 Patio.

    The takeaway

    The most effective small patio makeover is usually an edit, not an accumulation. Establish one purpose, keep the route clear, use the edges intelligently, and concentrate color and planting in a few deliberate places. The result feels inviting because there is room to use it.

  • Best Patio Furniture for Small Spaces

    The best patio furniture for a small space is not simply the smallest set on the sales floor. It is furniture that supports how you actually use the patio while leaving enough open floor for doors, walkways, and everyday movement.

    For most compact patios, the strongest starting points are an armless loveseat with a narrow table, a two-chair bistro set, a pair of lounge chairs with a shared side table, or flexible folding pieces. The right choice depends on whether your priority is dining, conversation, reading, or occasional extra seating.

    Start with the activity, not the furniture set

    Before measuring products, choose the main job for the space. A 6-by-8-foot patio used for morning coffee needs a different layout than the same patio used for outdoor dinners. Trying to support every activity at once usually creates clutter.

    • For coffee and conversation: two comfortable chairs and a small table.
    • For regular meals: a compact dining table with chairs that tuck fully underneath.
    • For lounging: a shallow loveseat or two lounge chairs, plus one movable surface.
    • For flexible use: folding chairs, nesting tables, or lightweight pieces that can be rearranged.
    • For storage-starved patios: a bench or side table that provides genuinely usable storage without blocking access.
    Four furniture layouts for a compact patio: dining, conversation, lounging, and flexible use

    Quick comparison: furniture types for compact patios

    Furniture typeBest forSpace-saving advantageWatch for
    Two-chair bistro setCoffee, reading, light mealsSmall footprint; easy to positionChair pull-out room
    Armless loveseatRelaxing with one other personMore seating per linear footDeep seats can consume floor space
    Two lounge chairsConversation and flexible seatingCan be angled or separatedWide arms add bulk
    Backless benchOccasional seatingCan tuck below a window or railLess comfortable for long sessions
    Folding table and chairsMulti-use patiosFloor can be cleared when neededRequires a place to store folded pieces
    Nesting tablesDrinks, books, and servingExtra surfaces occupy one footprintCheck stability on uneven paving

    This post may contain affiliate links. If you buy through them, Small Space Outdoors may earn a commission at no additional cost to you.

    Current product examples to compare

    These are current examples for three different small-patio priorities, not ranked picks. Small Space Outdoors has not personally tested them. Use the article’s measuring steps first, then confirm the current listing, total dimensions, assembly, care instructions, and delivery details before ordering.

    For a patio that needs to change jobs: Grand patio 3-Piece Folding Patio Bistro Set

    This example matches a dining-first or flexible layout. Amazon lists it as a three-piece set with two chairs and a round table, and the chairs and table fold. That makes it relevant when the floor needs to be cleared between meals, but you still need an appropriate place to store the folded pieces.

    View the Grand patio 3-Piece Folding Patio Bistro Set on Amazon.

    For two everyday seats and one useful surface: Best Choice Products 3-Piece Outdoor Wicker Conversation Bistro Set

    This conversation-focused option uses two separate chairs and one accent table rather than a loveseat and coffee table. The current Amazon listing identifies a storage compartment in the side table, which may help the table earn its footprint. Confirm chair depth, cushion-storage plans, and access to the table compartment in your taped layout.

    View the Best Choice Products 3-Piece Outdoor Wicker Conversation Bistro Set on Amazon.

    For flexible surfaces without replacing the seating: Meluvici Outdoor Patio Coffee Table Set of 2

    This example fits a patio that already has suitable seating but needs surfaces that can move with the layout. Amazon lists two round tables sold as a nesting set. They can be positioned for separate seats or grouped when fewer surfaces are needed; verify the current dimensions and how the two tables fit together before counting on a particular stored footprint.

    View the Meluvici Outdoor Patio Coffee Table Set of 2 on Amazon.

    Measure the usable rectangle

    Measure the patio itself, then subtract the areas that furniture cannot occupy. Include the full swing of hinged doors, the track area around sliders, stairs, gates, utility panels, grill safety zones, planters, and any path that must remain open.

    For comfortable movement, a main walking path of roughly 30 to 36 inches can be a useful general planning target where the space allows. A secondary path can sometimes be tighter, but it should still feel natural to use. Dining chairs also need room to pull back. This is not a universal code or property requirement; actual requirements can vary by property, local rules, and lease or association restrictions. Required egress, door operation, and applicable safety instructions always take priority.

    Use painter’s tape to outline each proposed piece on the floor. Then open the door, carry a tray through the space, pull out every chair, and sit down. This simple test catches crowded layouts before a delivery arrives.

    Choose dimensions that reduce visual and physical bulk

    Seat depth

    Deep lounge furniture can be comfortable, but it often has the largest effect on traffic flow. Compare the product’s total depth—not only the cushion depth—and include the space needed to approach and sit. A shallower seat may create more usable open floor without sacrificing the number of seats.

    Arm style

    Armless chairs and loveseats use their width efficiently and create cleaner sightlines. Slim open arms can provide support without the visual weight of thick upholstered or molded sides. If you prefer wide arms for comfort, reduce the number of other pieces rather than forcing a complete matching set into the layout.

    Table shape

    Round tables remove sharp corners from tight circulation zones. Square tables can sit neatly against a wall, while drop-leaf designs expand only when needed. Pedestal bases may provide more legroom, but stability matters—especially on a windy balcony or uneven patio.

    If a three-piece set fits your use case, see Best 3-Piece Patio Sets for Small Spaces for configuration-specific guidance.

    Furniture materials: choose for exposure and upkeep

    No material is maintenance-free in every climate. Powder-coated metal can offer slim frames but may chip or corrode if its finish is damaged. Wood brings warmth but usually requires periodic care. Woven synthetic materials can soften the look of a patio, though bulky frames and deep cushions may take up more room. Molded resin is often easy to move and clean, but quality and stability vary by construction.

    Evaluate the specific product instructions for cleaning, storage, wind exposure, weight limits, and weather protection. If cushions stay outdoors, plan where they will go during storms or the off-season before buying them.

    Storage furniture should earn its footprint

    A storage bench is useful only if the lid can open in its planned location and the interior suits what you need to store. Leave room behind or above the lid, check whether the contents need a separate weatherproof container, and avoid storing items that should not be exposed to outdoor temperature or humidity swings.

    For a closer look at access, ventilation, seating comfort, and placement, read Best Outdoor Storage Benches for Small Patios.

    Deep outdoor sofa and shallow armless loveseat compared in the same patio footprint

    Avoid the matching-set trap

    Small patios rarely need every piece included in a large coordinated collection. A loveseat, two chairs, coffee table, side table, and ottomans may look balanced in a catalog but leave no breathing room at home. It is often better to combine two or three pieces with similar color, scale, or material than to buy a complete set that dictates the layout.

    Keep one area of floor visibly open. That negative space makes the patio easier to navigate and helps individual pieces read as intentional rather than crowded. Our small patio makeover ideas show how lighting, planting, and color can add personality without adding more furniture.

    A practical buying checklist

    1. Write down the patio’s usable width and depth after door swings and permanent obstacles.
    2. Choose one primary activity and the minimum number of seats needed most days.
    3. Record maximum furniture dimensions, not just preferred dimensions.
    4. Map the layout with tape and test walking, sitting, and door operation.
    5. Check total product dimensions, weight, assembly requirements, care instructions, and storage needs.
    6. Confirm that chairs can pull out and that lids, drawers, and folding parts can operate fully.
    7. Decide where cushions and lightweight pieces will go during severe weather.
    8. Measure the delivery route, including gates, stairs, elevators, and doorways.

    The takeaway

    For a small patio, buy fewer pieces with clearer jobs. Start with the usable floor area, protect the walking path, and compare total dimensions before style details. Furniture that can move, fold, nest, or serve two sensible functions gives a compact outdoor space more options without making it feel busy.

    Working with a square footprint? Use the layout examples in How to Arrange Furniture on a 10×10 Patio before committing to a set.